Guide Book
Samsung SMART CAMERA NX System
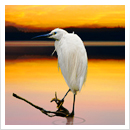
White Balance is compensated by the complementary color to the ambient light-
ing. When you set the white balance to fluorescent, red is added to offset the
blue-green of the fluorescent light, while blue is added to offset the red of the incan-
descent light. If you understand this principle, you can use white balance modes as
color filters. If you want to introduce a feeling of dawn during the daytime, you can
select Tungsten mode to shoot a bluish-toned photo.
Icon Description of options
Description
Auto WB*: Use auto settings depending on the lighting conditions.
Daylight*: Select when taking outdoor photos on a sunny day. If you use this setting, you
can take photos closest to the natural colors of the actual scene.
Cloudy*: Select when taking outdoor photos on a cloudy day or in shadow. Photos taken
on cloudy days tend to be bluer than on sunny days. This option compensates that effect.
Fluorescent White*: Select when shooting under a daylight fluorescent lamp. Especially for
white fluorescent light with a color temperature of about 4200K.
Fluorescent NW*: Select when shooting under a daylight fluorescent lamp. Especially for
white fluorescent light of very white hue with a temperature of about 5000K.
Fluorescent Daylight*: Select when shooting under a daylight fluorescent lamp. Especially
for white fluorescent light of slightly bluish hue with a temperature of about 6500K.
Tungsten*: Select when taking indoor photos under incandescent bulbs or halogen lamps.
Incandescent tungsten bulbs usually tend to have a reddish hue, but this option offsets the
yellow effect of incandescent light.
Flash WB*: Select when using a flash.
Custom Set: Use your pre-defined settings. You can manually set the white balance by
shooting a white sheet of paper. Fill the spot metering circle with the paper and set the
white balance.
* After selecting, this option allows users to set the details.
Chapter 4 061
Auto WB Daylight Cloudy
Fluorescent White Fluorescent NW Fluorescent Daylight
Tungsten Flash WB Custom Set
Guide Book
Samsung SMART CAMERA NX System
y CIE graph
0.9 Visible spectrum
Wide Gamut RGB
0.8 Adobe RGB(1998)
0.7 CMYK(Janpan Standdard v2)
sRGB
0.6
0.5
0.4
0.3
0.2
0.1 x
0
0.1 0.2 0.3 0.4 0.5 0.6 0.7 0.8 0.9
Digital imaging devices such as digital cameras, monitors, and printers have their
own ranges for representing colors. This available range of color representation is
called color spaces. Each device has several fixed standards for color spaces. The
camera supports sRGB and Adobe RGB. sRGB(Standard RGB), the international
standard established by the IEC(International Electro-technical Commission), is
defined from the standard values for regular PC monitors and is also widely used
as the standard color space for Exif. sRGB is recommended for regular images.
Adobe RGB is recommended for commercial printing by Adobe Systems in the
US.
You can choose either sRGB orAdobe RGB, but if you chooseAdobe RGB in your
camera and shoot a photo, you need to select Adobe RGB for the editing program
in your computer to see the correct colors in the photo.
063 Chapter 4
There are three AF modes: Single, Continuous, and Manual. When you focus on
a subject and press the shutter halfway in single AF mode(SAF), the focus will be
fixed even if the subject is moving. On the other hand, when you are pressing the
shutter halfway in Continuous AF(CAF) mode, the focus keeps tracking the mov-
ing subject. SAF is recommended for shooting a still subject such as landscape,
and CAF is recommended for shooting a person or sports.
MF mode is the manual focus mode, which allows users to manually focus on
a subject by rotating the focus ring, and it is employed when users can't focus
because it is nighttime, or the subject is a white wall, or the sky. Focusing in this
mode is slower than auto focus but recommended when auto focus does not work
properly.
If the lens has an AF/MF button, you need to switch it according to the selected
mode. Set the button to AF in the case of single AF or continuous AF, and to MF in
the case of manual focus. (Single AF and continuous AF can be controlled in Menu)
Guide Book
Samsung SMART CAMERA NX System
The AF(Auto Focus) AREA function is for Landscape : Shooting in SAF mode
changing the position of the focus area Moving subject : CAF mode
on the screen. When you take a photo Night scene : MF mode
of a subject, the subject might be at the
center or at the side of the screen, and
selecting the appropriate AF area allows
you to focus and shoot fast.
Selection AF allows you to move the AF
point on the screen and set the focus on
the area you want, and in Multi AF the
camera displays all the areas where the
focus is set correctly on the screen.
Face detection AF is a function that fo-
cuses on a face once it appears on the
screen, and is therefore recommended
for portrait shooting.
Self-guide AF emits a sound effect to
check if a face is well-focused, so this
function is useful for shooting a self-por-
trait while traveling alone.
065 Chapter 4
You can focus fast if you use the single AF function properly.
Skilled users can focus correctly without moving the AF zone,
but beginners may need to move the focus zone for correct fo-
cusing.
If you have trouble focusing on your subject's face because the
focus zone is positioned in the center, you can press the shutter
halfway and the OK button on the back to display four direc-
tional arrows on the screen as shown in the example below,
then use the wheel key to place the focus zone correctly over
the subject's face. Rotate the jog dial to adjust the size of the
square indicating the focus zone.
Adjust using the jog dial and wheel key
Guide Book
Samsung SMART CAMERA NX System
Half pressing the shutter is done by press- ● Compose the image.
ing the shutter button down lightly instead of
pressing it all the way for shooting; half press- ●● Adjust the subject to be in fo-
ing changes the focus mark on the screen cus and maintain light pressure
to green, adjusts the focus and shows the on the shutter button.
shutter speed and the aperture value on the
screen along with the exposure measure- ●●● Compose the previous
ment. At this point, keeping a light pressure on image and press the shutter to
the shutter button will maintain the focus as it take the photo.
is. (Applicable to SAF only) In actual shooting,
it is always best to press the shutter button
half way to check the focused area, and then
press the button fully down to take a photo.
Let's try the AF-LOCK function. Fix the focus
zone in the center, place the subject in the
center of the screen, and then press the shut-
ter halfway to focus. Compose the image by
moving the camera while continuing to press
and hold the shutter halfway down to fix (lock)
the focus, and then press the shutter all the
way down to take the shot.
067 Chapter 4
Most photos can be taken using the AF function, but some-
times this function can get confused - for example when trying
to shoot a wall of a single color, a cloudless sky, or an animal
behind cage bars.
You can use the MF function in these cases, so select MF mode
and set the magnification to enlarge the screen in MF shooting
from the MF ASSIST menu. You can select between 5x and 8x.
The center part of the screen is magnified 5 times (or 8 times),
while you are rotating the focus ring. When you select the MF
function, a vertical green bar on the left shows the accuracy
of the focus in a graph when shooting. The longer the bar, the
more accurate the focus.
Guide Book
Samsung SMART CAMERA NX System
Drive mode provides the option to shoot one picture at a time or to select continu-
ous shooting when pressing the shutter. L mode, continuous shooting, captures 3
shots per second so it is recommended for photos of events or a moving subject;
while H mode captures 8 shots per second and so is recommended for shooting
sports activities. BURST mode captures 30 shots per second so it is recommend-
ed for analyzing motions such as golf swings precisely.
AEB(Auto Exposure Bracket) mode captures 3 consecutive shots with normal ex-
posure, overexposure, and underexposure respectively, so it is useful for shooting
photos sensitive to exposure, such as photos of artworks. WB(White Balance)
Bracket captures images according to 3 pre-set white balances. PWB(Picture Wiz-
ard Bracket) captures 3 shots according to preset picture wizard values. Each can
be set in the Bracket menu.
Icon Description
Ordinary shooting Capture one photo whenever you press the shutter
Continuous shooting Continuously capture photos while you are pressing the shutter. You
High-speed shooting can take up to 3 shots per second
Self timer Consecutively capture up to 30 shots per second when you press the
Exposure BKT shutter once
WB BKT Capture a photo automatically after a delay set on the self-timer
Picture Wizard BKT (from 2 to 30 seconds, adjustable in increments of 1 second)
When you press the shutter, the camera takes 3 consecutive shots:
the original, one a step darker, and one a step lighter
When you press the shutter, the camera takes 3 consecutive shots:
the original shot and two more with different white balance settings
When you press the shutter, the camera takes and stores
3 consecutive shots, with a different Picture Wizard setting for each
Chapter 4 069
In the detail bracket setting on the menu, there are 3 options
(AEB, WBB, PWB). Exposure difference, color temperature, and
type of picture wizard for each option can be selected from the
detail menu. AEB and WAB cannot be used at the same time.
-1EV darker Normal exposure +1EV lighter
Guide Book
Samsung SMART CAMERA NX System
Gray card
The basics of shooting photos are focus and exposure. Optimum exposure means
receiving the correct amount of light at an adequate level during shooting. To do
this, it is necessary to adjust the aperture and the shutter speed. A lower exposure
(underexposure) means a darker photo, whereas a higher exposure (overexpo-
sure) means a brighter photo due to an excessive amount of light.
Then what is the standard for optimum exposure? Optimum exposure is based on
neutral gray (a 'gray card') whose average brightness has 18% reflectance. There-
fore, when the average reflectance of a subject on the screen exceeds 18%, the
camera automatically adjusts the shutter speed to be faster or the aperture value
to be smaller in order to reduce the amount of light. Conversely, when the average
reflectance is less than 18%, the camera adjusts the shutter speed to be slower or
opens the aperture to increase the amount of light.
A photo considered to be bright A photo considered to be dark
071 Chapter 4
Since the camera measures the average brightness of the whole screen, it often
recognizes exposure incorrectly. For example, when you shoot a portrait photo
with lots of sky in the background, the camera recognizes the overall exposure as
bright, because of the brightness of the sky, whereas the brightness of the subject
is barely taken into account because of its relatively small portion in the picture; this
reduces the level of exposure, resulting in a darker photo. Therefore, when shoot-
ing with backlight, subjects often appear darker in the actual photo. Conversely,
when shooting a sunset, the photo may appear brighter than the actual sunset
that we can see, resulting in a photo with less ambience, because the camera in-
creases the level of exposure due to the darkness of the sky. As a result, you can't
always trust the level of exposure determined by the camera, but need to adjust
exposure levels according to your own judgment, based on the exposure value in
the camera.
The camera exposure level indicator will measure too dark in backlight and too bright
at sunset.
Guide Book
Samsung SMART CAMERA NX System
In order to measure exposure better, users need to select the appropriate
exposure measuring range. You can select to measure the exposure as
an average of the whole screen, to measure it in center-weighted mode,
or to measure it only at the center of the screen. Multi measurement
is recommended for scenes where the subjects are of an even bright-
ness across the screen; center-weighted is recommended for situations
where there is a slight difference in brightness between the subject in the
center and the surrounding objects; and spot is recommended for when
there is a significant difference between the main subject and the sur-
roundings; and for this, you can position the main subject at the center
of the screen and press the shutter halfway to measure the exposure.
Icon Description
Spot • Calculate the amount of light at the center
• Suitable for the exposure at a specific area
Center- • Suitable when there is a difference in brightness between the
weighted center and the surroundings
Multi • Measure putting more weight on the center
• Suitable for when a subject in the center is dominant on the screen
• Calculate the amount of light in multiple areas
• Suitable for normal photos
Chapter 4 073
Multi measurement for normal subjects
Spot measurement
if there is a big gap in brightness
Center-weighted measurement for a portrait
Guide Book
Samsung SMART CAMERA NX System
One of the important considerations in taking a good picture is exposure compen-
sation. This is because even the best subject cannot create a good impression
when its brightness doesn't match the overall feeling of the photo. Simply check
the brightness through the LCD screen after shooting, and adjust the exposure us-
ing exposure compensation if the brightness is higher or lower than you expected.
The difference between professional photographers and amateur photographers
is immediately obvious from looking at exposure compensation.
(+) ⇠ ⇢ (-)
Chapter 4075
Exposure compensation can be done easily in P, A, and S modes, but not in Smart
Auto mode or M mode, and the camera is designed to allow for exposure compen-
sation of up to ±3 stops. Note than you need to return the exposure compensation
level to its original position after compensating for exposure. If not, the exposure
value that you have set will be applied to the next photo as well, resulting in unex-
pected output.
⇣ Example. Screen display can
differ depending on the setting.
Exposure warning indicator Standard exposure index
Decreased exposure (Darker) Exposure level
indicator
Increased exposure (Brighter)
Guide Book
Samsung SMART CAMERA NX System
5 Setting and Shooting Guide
for Beginners
There are certain settings in digital cameras that you need to select before shoot-
ing a photo. These include the ISO setting, the white balance setting for lighting
conditions, and the focus and exposure methods. If you are already familiar with
cameras, you may be able to make these settings easily, but it may not be so easy
for beginners to select the appropriate ISO, white balance, and exposure. To solve
this, Smart Auto mode can be used.
In Smart Auto mode, the camera selects the most appropriate ISO for the subject
to allow smooth shooting, and automatically sets the white balance and scene rec-
ognition to detect the color temperature at the location for the best color. Along with
this, the camera automatically sets the exposure value (aperture value and shutter
speed). Using Smart Auto mode, an absolute beginner can shoot great photos be-
yond their expectations. However, if you have a specific level of exposure or color
you want to use, that cannot be selected in Smart Auto mode. All data settings in
Smart Auto mode are done automatically by the camera, so there are no user set-
tings. Therefore, this mode is preferred by beginners.
Chapter 5 077
Smart Auto: Portrait shooting
A white square indicates that the
face has been recognized, and
the face recognition mode icon is
lit at the bottom of the screen.
Outdoor landscape shooting Close-up text shooting
Very bright background shooting Sunset shooting
Night landscape shooting Blue sky shooting
Nature shots of greenery such as forests
Night outdoor portrait shooting and leaves
Backlight landscape shooting with Colored subject close-up shooting
no face
Backlight portrait shooting Portrait close-up shooting
Portrait shooting Shooting with the camera fixed on
a tripod, with no movement for a certain
period of time
Close-up shooting Shooting when the subject moves
continuously
When you press the shutter halfway in the Smart Auto mode,
one of the recognition mode icons will be lit.
Guide Book
Samsung SMART CAMERA NX System
The i-Function in the existing NX system has been given a sig-
nificant upgrade. New combinations and functions considering
user convenience have been added in terms of adjustments
that used to be made by clicking the i-Fn button on the lens to
select a function, and rotating the focus ring on the lens. This
new function starts up by selecting the the ⓘ icon selection on
the camera mode dial. After selecting the Lens Priority mode,
you can select either the i-Effect or i-Zoom function by pressing
the i-Function button on the lens.
079 Chapter 5
In i-Effect, scene modes optimized according to the lens and 6
types of digital filters are offered, so that the most suitable set-
ting for a given shooting environment, and the filter function that
allows for full expression, can be applied easily.
The i-Zoom is a kind of digital zoom function that allows users
to employ the zoom function up to double the size without com-
promising image quality. When the current lens mounted is a
zoom lens, it can be used with increased magnification, while if
the lens is a fixed focus lens, a zoom lens effect can be applied.
Scene modes : Beauty Shot, Portrait, Children, backlight, Landscape, Sunset,
Dawn, Beach & Snow, Night
Filters : Vignetting, Miniature, Fish Eye, Sketch, Defog, Halftone Dots
Guide Book
Samsung SMART CAMERA NX System
You can use the i-Fn button on an i-Function lens to adjust aperture, shutter speed,
exposure compensation, ISO, and white balance conveniently and quickly. When
you press the i-Fn button on the lens in PASM mode, functions such as aperture,
shutter speed, exposure compensation, ISO and white balance are displayed ac-
cording to the shooting mode; and the function changes each time you press the
button. You can also turn the jog dial on the top of the camera to change function.
You can also use the i-Zoom digital zoom function in any shooting mode.
After selecting the function you want, you can adjust the detailed settings for that
function by rotating the focus control ring on the lens. You can also use the search
dial on the back of the camera. After setting, you can either press the shutter half-
way or the OK button. The functions that can be adjusted according to PASM
mode are as follows:
Shooting mode P A S M
Shutter speed
Aperture
Exposure compensation
White balance
ISO
i-Fn button functions according to the shooting mode
081 Chapter 5
A photo taken using the Smart Auto function
24mm ISO100 f 5.6 1/340s
Guide Book
Samsung SMART CAMERA NX System
SMART Auto mode
43mm ISO200 f8.0 1/125s
083 Chapter 5
Scene mode sets frequently used scenes in advance with the most suitable shoot-
ing conditions for each scene, so that beginners can choose the best settings for
each type of scene. In scene mode, there are in all 15 different options includ-
ing beauty shot, night, landscape, portrait, children, sports, close-up, text, sunset,
dawn, backlight, fireworks, beach & snow, sound picture, and 3D. When you se-
lect and use the scene you want, you can capture great photos without doing any
further; and beginners can create the sort of image that you would normally expect
from experts. Also, the camera automatically sets the AF area appropriate for the
scene mode chosen.
Guide Book
Samsung SMART CAMERA NX System
Beauty Shot
This mode allows you to shoot a subject with clear, smooth skin tones. You can
adjust the brightness and softness of the skin in 3 levels, and create clear skin tone
without having to edit later. Normally users make such editing adjustments on their
computers after taking portrait photos. Scene mode reduces such post-shot edit-
ing, and users can check the effects right after shooting a photo. The AF area is
switched to AF mode for portraits.
085 Chapter 5
Night
Set to a slow shutter speed to create a night time mood, with long exposure. In
normal mode, if there is strong lighting in the picture, the exposure over the rest of
the picture would be insufficient. But in night mode, a dark street at night shows up
brightly due to long exposure. However, when using a slower shutter speed like
this, your best shots will likely come when using a tripod to prevent a camera from
shaking.
Guide Book
Samsung SMART CAMERA NX System
Landscape
This mode allows you to shoot more natural and picturesque
landscapes with the perfect light. Landscape mode provides
the best settings for a photo of appropriate depth in clear and
vivid colors.
087 Chapter 5
Portrait
Human faces are one of the most common subjects in photog-
raphy. Portrait mode on the Samsung NX automatically detects
the subject's face and selects the appropriate focus and expo-
sure settings. Portrait mode is ideal for shooting smooth portraits.
Guide Book
Samsung SMART CAMERA NX System
Children
Adjusts the aperture to the maximum level and increases the
shutter speed to take natural shots of active children at play.
089 Chapter 5
Sports
This mode is also great for shots of fast moving objects. Be-
sides sports, most snaps in our daily lives contain a moving
subject. Sports scene mode is useful for capturing quick move-
ment in sports activities.
Guide Book
Samsung SMART CAMERA NX System
Close Shot
This mode is appropriate for shooting a small subject, such
as close-ups of flowers and insects. Users can zoom up to as
close as approximately 10cm and then focus on their subject
using the camera's macro lens effects. This mode is very ef-
fective for close-up shooting and also gives an excellent out-of-
focus effect.
091 Chapter 5
Text
This mode is ideal for capturing documents or text. It creates a
slightly stronger contrast than normal mode, so it is useful for
shooting documents or text.
Guide Book
Samsung SMART CAMERA NX System
Sunset
This mode allows you to create the best sunset scene. It helps
capture the proper color for a sunset and produces a very ro-
mantic scene. When you shoot a portrait or commemorative
photo with a sunset in the background, you can make the most
of the red in the sunset.
093 Chapter 5
Daybreak
The mood of dawn is bluish. This mode adds a bluish light to
brighten the mood of dawn. When you take a picture of any
subject in this mode, the photo will retain a slightly blue tint.
Guide Book
Samsung SMART CAMERA NX System
Backlight
This mode is useful for situations where the backlight or back-
ground is very much brighter than the subject. When you at-
tach a flash, the shutter speed is set to the bright background
first and the background and subject then appear naturally in
backlight. If you don't have a flash, you will need to increase the
exposure value to prevent the photo from being too dark as a
result of the backlight.
095 Chapter 5
Fireworks
When you shoot fireworks in Single mode, you need to set long
exposure and small aperture values. In this scene mode, these
are set automatically. Since you will be using a shutter speed of
more than several seconds, a tripod must be used. If you shoot
without a tripod, the image will be blurred due to movement.
You also need to anticipate where the fireworks will burst in or-
der to compose the screen in the optimal way.
Guide Book
Samsung SMART CAMERA NX System
Beach & Snow
This mode is useful for shooting beach or snow scenes. Taken in normal shooting
mode, beach or snow scenes will appear somewhat darker than normal due to
the high reflectance of snow and sand. Experts might be able to compensate the
exposure value for this effect, but beginners may not always know how to do this.
Shooting in beach & Snow mode automatically compensates for this exposure.
Chapter 5 097
Sound Picture
In this mode, you can add voice memos before and after taking photos. When you
press the shutter halfway, recording begins and sound is recorded for 5 to 10 sec-
onds until you press the shutter again. After shooting, sound is recorded again for
5 to 10 seconds so that a total of up to 20 seconds can be recorded. This mode is
useful for creating field sounds at a shooting location, or even just adding a simple
voice memo related to the shot. ⇢ Sound Picture : NX20, NX210
Guide Book
Samsung SMART CAMERA NX System
6Setting for Intermediate Users
After graduating from the beginner level, users will probably
move to a stage where they want more control over how their
photos turn out. In this stage, users have the options of P mode,
Aperture Priority or Shutter Priority mode to adjust settings ac-
cording to their own choice for more creative photos, rather than
shoot automatically using Smart Auto or Scene mode.
A photo with the feeling of dawn emphasized. ISO100 f4.4 1/125s
099 Chapter 6
In P(Program) mode, the camera automatically sets the best
shutter speed and aperture value for capturing a subject. The
camera also sets the optimal exposure value for shooting the
subject even if there are variations at the shooting location.
However, when they use P mode, users will also need to adjust
settings other than exposure themselves. For example, users
also need to compensate for exposure when they shoot in a
backlight situation. At this point, users will be able to use the ex-
posure compensation skills they have learned; and when they
master it, they will be able to produce more details in their shots
than by simply using Smart Auto mode.
The camera automatically sets the exposure but users can op-
erate the jog dial on the top of the camera to select the exposure
combination of aperture and shutter. They can then rotate the
jog dial on the top of the camera, observe the changes in aper-
ture and shutter value on the LCD screen, and take a great shot.
Guide Book
Samsung SMART CAMERA NX System
ISO100 f3.8 1/250s
101 Chapter 6
This mode is a semiautomatic exposure mode, where you can select an aperture
value manually. After you select an aperture value, the camera will automatically
set a shutter speed appropriate for the depth of field you want. This mode is most
frequently used by those who take pictures, and in this mode, increasing the ap-
erture value provides an out-of-focus effect that separates the subject from the
background. In contrast, decreasing the aperture value makes both the subject
and the background captured in the shot sharper and more in focus. Using this
aperture feature will help you present your subject more vividly.
However, be warned that a higher aperture value will lead to a reduced amount of
light and a slower shutter speed, so your photo may be blurred in low light due to
the very slow shutter speed. Therefore, make sure that the shutter speed is auto-
matically adjusted at the same time when you change the aperture value.
Normally, the shutter speed required to prevent a blurred photo varies according
to the focal length of the lens. Basically, the shutter should not be slower than 1/60
sec at least, for example, the minimum shutter speed for a 100mm lens would be
1/100 sec and the minimum shutter speed for a 200mm lens would be over 1/200
sec to prevent blurring.
Guide Book
Samsung SMART CAMERA NX System
f1.4 f2 f2.8 f4 f5.6 f8
If you were to compare a camera to a person's eye, the aperture would be like the
pupil, adjusting its size according to the brightness of light for the appropriate level
of exposure. Apart from the aperture, the shutter also adjusts the camera's expo-
sure, combining these two to create the appropriate light exposure.
The size of the aperture is expressed in a number called the 'F value'. F values
are calculated by dividing the focal length of the camera lens by the effective
aperture. For example, if the F value of a lens with a 50mm focal length is F2,
50mm/25mm=F2, then the effective aperture is 25mm. So, the smaller the F val-
ue, the larger the effective aperture.
The brightness in a photo changes according to the amount of light passing
through the aperture, and an aperture exposure of one is expressed as 1EV. As
the exposure value increases by 1EV, the amount of light doubles, and as the
exposure value decreases by 1EV, the amount of light decreases by half. You can
further adjust the amount of light more precisely by using the exposure compensa-
tion function to divide the exposure value into 1/2 and 1/3EV.
103 Chapter 6
If you use depth of focus properly when taking a photo, you can adjust the depth
as desired and take the exact photo you want.
For example, many portrait photos may blur the background to emphasize the
subject, and in this case, the aperture is increased to give a narrow depth of field.
For landscape photos, the foreground and background of a subject are normally
kept sharp, and in this case the aperture should be reduced to create a greater
depth of field. But increasing the aperture by itself doesn't make a narrow depth
of field. In order to make a narrow depth of field, it's important to follow the steps
below.
Far Close
⇢ How to adjust the depth of field (depth of focus)
● The larger the aperture, the less the depth of field, and the smaller, the greater.
● Using a telephoto lens with a longer focal length produces a smaller depth of field,
whereas using a wide-angle lens with a shorter focal length gives a greater depth of
field.
● The shorter the shooting distance, the less the depth of field, and the longer, the
greater.
Guide Book
Samsung SMART CAMERA NX System
A photo taken using f2 to create a A photo taken using f11 to create a wide
narrow depth of field. The background depth of field. The background is also in
is not in focus, so the feeling of depth is focus, so there is no feeling of depth.
emphasized.
The Custom button will help give you an idea of
what your shot will look like with the given depth
of field before shooting. The camera adjusts the
aperture to the predefined settings and shows
the results on the screen. When you set the
Custom button to Optical Preview, you can see
the depth of field status in advance by pressing
the Delete button.
105 Chapter 6
A photo taken using f11 to make both the foreground and background clear
ISO100 f11 1/125s
Guide Book
Samsung SMART CAMERA NX System
A photo taken with a 200mm telephoto lens and an f5.6 aperture value
- opened as wide as possible.
ISO100 200mm f5.6 1/500s
107 Chapter 6
The shutter also adjusts the amount of light in a photo, and as such, is like the
camera's eyelid. The shutter adjusts the amount of light by the speed with which
the shutter opens and closes, and usually, a fast shutter speed means a speed of
over 1/250 sec, and speeds like 1/30 sec are considered slower. In S mode, you
can adjust the shutter speed manually, and when you do, the camera will automati-
cally set the appropriate aperture value according to the shutter speed you have
chosen.
This mode is convenient for shooting a moving subject or expressing movement.
For example, when you set shutter speed sufficiently fast to stop a moving sub-
ject in action shots, you don't need to adjust the exposure, and the camera will
automatically set the aperture value for an appropriate exposure. This mode can
prevent the shakiness that occurs with a lower shutter speed in P mode. When
you set an appropriate shutter speed and shoot a photo of running water or a
moving subject, the camera automatically sets the aperture value according to the
subject's speed of movement. When you set a fast shutter speed on a cloudy day
or indoors, the aperture will open to the maximum level, but the photo will still be
dark as a result of insufficient light. So you need to reduce the shutter speed little
by little until you get the image brightness right.
Guide Book
Samsung SMART CAMERA NX System
Exposure volume +1EV
-1EV
1 s 1/2 sec 1/4 sec 1/8 sec 1/15 sec 1/30 sec
Shutter speed
In S mode, shutter speed can be adjusted manually. Shutter
speed is measured in EV(Exposure Value) and indicated in in-
tervals of 1 sec, 1/2 sec, 1/4 sec, 1/8 sec, 1/15 sec-1/1000 sec
and 1/2000 sec. When the shutter speed is moved up one step,
the amount of light decreases by 1EV.
A photo taken using 1/60 sec A photo taken using 1/6 sec
109 Chapter 6
A blurred photo of a subject due to slow shutter speed.
A moving subject must be captured with a fast shutter
speed to prevent the photo from being blurred.
The words you are searching are inside this book. To get more targeted content, please make full-text search by clicking here.
A useful guide to using and taking photos with the NX1000 camera
Discover the best professional documents and content resources in AnyFlip Document Base.
Search