Guide Book
Samsung SMART CAMERA NX System
In A-TTL(Advanced Through The This mode allows users to manu-
Lens) mode, the preset ISO, ex- ally adjust the flash output emitted
posure, focal length of lens, and by the flash to 6 levels (1/1, 1/2, 1/4,
range-finder dial are interconnected 1/8, 1/16, and 1/32). The flash fires
to ensure the flash emits the correct according to this setting regardless
amount of light. of the camera settings, thus manual
mode might be challenging for begin-
Pressing the shutter button activates ners without much experience.
a pre-flash to calculate the ideal
amount of light for the flash to emit, The accurate exposure must be
enabling a faster charging speed. In calculated, and the 1/1 level emits
A-TTL mode, the optimal amount of the maximum amount of light output
light is calculated without extra ex- available. In other words, it delivers
posure compensation in situations the maximum amount of light. This
where bounce flash is used. mode can be used in a large space,
or somewhere that requires a great
In A-TTL mode, the amount of light deal of light. Since all the available
for Smart Auto, Program(P), A, and S light is emitted at this level, more time
modes is automatically set, so even will be needed to recharge the flash.
beginners with little understanding of As a result, this mode may not be
the use of flash can easily use it to appropriate for continuous or snap
take great photos. shooting.
Chapter 8 161
Camera mode Smart Auto Aperture Shutter Manual(M)
Program(P) Priority(A) Priority(S)
Aperture value Auto Manual Auto Manual
Shutter speed Auto Auto Manual Manual
Flash light output Auto Auto Auto Auto
Setting the flash light output, aperture value and shutter speed in A-TTL mode.
You don't have to limit flash use to indoors or night time. You can also use flash out-
doors for backlight shooting, in order to compensate for exposure. Another option,
in backlight, is to attach the flash and shoot in A-TTL mode, which will compensate
for the dark area on the subject's face.
A photo taken according to the exposure level indicator of the camera, without using
flash. Because the camera responds to the brightness of the background, causing
an extreme exposure difference between the subject and the background, the result
is a dark subject. f8 1/125 18-55mm (Left)
When you use flash, the exposure difference between the subject and the
background can be compensated, so that the exposure on both the subject and the
background is appropriate. f8 1/60 18-55mm (Right)
Guide Book
Samsung SMART CAMERA NX System
When you use flash at night to shoot a subject with some fabulous landscape in
the background, the background will be dark and only the subject will be well lit.
The reason for this is the shutter speed. When you use P mode, the shutter speed
sets itself to a minimum of 1/30s, and the flash delivers sufficient light to the sub-
ject; but the background is too far from the flash, and the shutter speed is too fast,
to deliver light to the background.
In this case, use Shutter Priority mode or M mode instead of P mode, set the shut-
ter speed to 1/2 sec-1 sec, and use the flash. But you need to note that because
the shutter speed is very slow, it is recommended to use a tripod, and the subject
should also remain completely still for 1/2 sec~1 sec.
163 Chapter 8
30mm ISO100 f5.6 1/2s
The photo was taken in M mode with 1/2 sec shutter speed and a tripod to show
both subjects and background well. However, if this was shot in P mode, the back-
ground would be dark. When you shoot a photo during the Magic Hour, just after
sundown, the color of the sky goes blue, adding a more beautiful effect to your
photo.
⇠ ⇠ The subject and the background are blurred together
because the subject moved during the 2 second exposure.
⇠ The background is dark because the shutter speed was
too fast, even though the flash was used.
Guide Book
Samsung SMART CAMERA NX System
9Landscape Shooting Guide
Being in and enjoying the beauty of nature is a blessing and can make for wonder-
ful memories. Beautiful landscapes invite us to capture what we can see with our
camera. But the feeling of the landscape that we see with our eyes and the feeling
as captured in a photo can be very different.
This is because the three-dimensional effect of landscape is inevitably lost when
it is captured in a photograph and translated to 2D. In order to maintain the extra
sense of dimension that we perceive, we must carefully compose the main sub-
ject, secondary subject and the background of the photo.
You cannot shoot a good photo just by pressing the shutter wherever you are
standing. In order to create an effective composition, you need to consider the
distance between subjects, and their size, set the focal length of the lens in your
chosen direction, and consider all the distances and angles comprehensively.
The background of your shot is also an important element. This is because the
background is the environment in which the subject is set. And the environment is
directly connected to the sense of space; sometimes, it may even take on more
significance than the subject itself in your shot. In order to achieve good results,
you need to arrange the composition or 'direct' the scene.
165 Chapter 9
Set the Pyramids as the main subject and the person
riding on a camel as the secondary subject.
18mm ISO100 f11 1/125s
Guide Book
Samsung SMART CAMERA NX System
In order to give a sense of space to the photo even if the theme is the same, set the
trees in the foreground as the secondary subject in order to avoid monotony, and
add a real sense of space.
18mm ISO100 f11 1/125s
167 Chapter 9
The horizontal and vertical proportions that give the 'golden section' are 1:1.618.
However, most people simplify this by trisecting the screen and calculate propor-
tions in the ratio of 1:2. So when you divide a rectangular screen into three equal
parts both vertically and horizontally, there will be four cross points on the screen.
By positioning your subject based on these cross points, you can make your com-
position conform to the golden section. The cross points on the yellow lines show
that the subject is located at the 1/3 point.
Guide Book
Samsung SMART CAMERA NX System
Chapter 9 169
Triangular composition You can quite quickly learn the principles of taking
a photo and the techniques of handling a camera.
But the important business of crafting composi-
tions for a creative photo take a lot longer and
require plenty of experience. There is no formula
for photographic composition, but you can learn
how to put together basic compositions and then
develop your own creativity.
There is nothing particularly difficult about com-
position. Composition is about organizing your
thoughts on how to place the main subject, the
secondary subject that acts as a foil to the main
subject, and the background, and putting these
elements together on the screen.
Curved composition Diagonal composition
Guide Book
Samsung SMART CAMERA NX System
You can combine and use basic compositions, or you can break
with tradition and develop your own composition style to create
unique photos. If you study photography and accept that the
formulae for composition are not fixed in stone, you will discover
the fascinating world of photography.
Vertical composition Tunnel composition
Radial composition Inverse triangle composition
171 Chapter 9
The importance of light was emphasized in the portrait shooting
section; it is equally important for landscape shots. When you
shoot a landscape, as with a portrait, you can use backlight or
normal light to create a photo with a sense of space, if time al-
lows.
When professional photographers shoot a landscape, they
determine when the best lighting for the landscape occurs by
carrying out a survey in advance, and shoot during that time.
This shows that the role of light in photography is paramount.
In order to shoot a good photo, you need to enjoy the beauty of
nature and wait for the right time.
Front light 18mm ISO100 f8.0 1/250s Backlight 18mm ISO100 f8.0 1/250s
Photos of the same village taken in front light and backlight. The photo taken in front
light shows weak contrast and no shadows, so it looks flat and even overall; but the
photo taken in backlight has clear shadows, with a sense of space, so it has strong
contrasts.
Guide Book
Samsung SMART CAMERA NX System
130mm ISO100 f5.6 1/400s
Chapter 9 173
75mm ISO100 f6.3 1/400s
Guide Book
Samsung SMART CAMERA NX System
The cloudy sky has a high color temperature creating a bluish scene. The image
composing the sea and the sky together shows the well-matched color temperature
of the light source.
20mm ISO100 f6.0 1/100s
175 Chapter 9
These photos were taken at the same location using both front light and backlight.
The photo taken with front light on the left seems bright and cheerful in general, but
there are no shadows, so the mood created is flat. The photo taken with backlight
on the right is a photo with strong contrasts due to the shadows. Therefore, it is not
always necessary to compensate for exposure in landscape shooting, even when
using backlight.
Guide Book
Samsung SMART CAMERA NX System
85mm ISO100 f2 1/500s
If you are having trouble with composition, it is worth trying to remove unnecessary
elements from the scene. This image is set up with a slightly narrower angle of view,
with an 85mm medium telephoto lens. Simple images can produce the effect of
drawing our attention to one point. Actively arranging the image rather than being
straight-jacketed by the rules of composition can be a good way to get a better photo.
177 Chapter 9
50mm ISO100 f6.3 1/400s
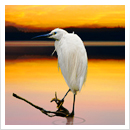
This photo would have been an ordinary landscape photo if it were not for the black
bird at the bottom of the scene, which transforms the photo into an eye-catching one.
In this case, vertical framing is an effective way of drawing in our attention.
Guide Book
Samsung SMART CAMERA NX System
A photo taken with -2EV lower than the one showing
on the exposure level indicator, to emphasize the red
color of a sunset.
16mm ISO100 f5.6 1/750s Manual mode
Many landscape photos are taken at sunset or at night. The important thing for
sunset shots is to take the photo at the right time. The sun goes down very fast
at dusk. A sun that is low on the horizon can disappear below the horizon in an
instant. Even if you set up a tripod and compose the image in advance, you will not
be able to take many photos.
An important element for sunset shots is exposure compensation. Regardless of
which mode you are using, whether P, A, or S, it is necessary to compensate for
the exposure. The camera recognizes the sunset environment as very dark and
sets a slow shutter speed, so the photo that is captured will be brighter than what
we actually see. Therefore you need to set the exposure to -3 steps darker, check
the level when shooting, and adjust it towards (+) if necessary.
Chapter 9 179
20mm ISO200 f4.5 1/2000
Guide Book
Samsung SMART CAMERA NX System
Night photos are always popular, but taking them is not as easy as we may think.
This is because it is difficult to adjust the exposure. When you shoot a photo in P,
A, or S mode, the photo will come out bright. Try setting the aperture to f8, and
then gradually reduce the shutter speed from 1/30 sec to 1/15 sec or 1/8 sec, and
shoot. If the subject is a city at night, you may need to use shutter speeds from 1
second up to about 10 seconds. For slow shutter speeds over 1 sec, you need to
fix the camera firmly on a tripod, press the shutter and remove your hand care-
fully from the camera. If you are not careful, the photo will be blurred as a result of
movement.
A photo of letters 'written' in the air with a mobile phone light and a 30 sec shutter.
18mm ISO100 f8.0 30s
181 Chapter 9
It is difficult to find an accurate exposure value for night shooting. Therefore, you need
to find the appropriate exposure value by shooting a series of test shots from 1/30 sec
down through slower shutter speeds.
21mm ISO100 f5.6 ↳ 1s, 1/3s, 1/10s
Guide Book
Samsung SMART CAMERA NX System
16mm ISO100 f14 15s Manual mode
183 Chapter 9
Even for night photos, a photo with a bluish sky is more colorful and beautiful than
a photo with a dark sky. After sundown, a bluish light remains in the sky for about
30 minutes and you can shoot a better-looking photo during that time. The photo
below was taken without a tripod, increasing the ISO to 1600, setting the aperture
to f5.6 and leaning against a tree in the street to minimize movement. Using a
tripod is recommended to reduce shakiness.
18mm ISO100 f8 1/30s Manual mode
Guide Book
Samsung SMART CAMERA NX System
10 Close-up Shooting Guide
Beginners in photography are easily moved by close-up shots. Close-up photos
express a beauty that we cannot always see with the naked eye, and photos of
flowers are particularly easy to shoot and give great satisfaction in comparison to
the effort invested. Close-up shooting requires a close-up lens (60mm Macro). As
always, it is recommended to use a tripod to prevent the camera from shaking.
On a windy day, flowers will sway causing photos to be blurry even when using a
tripod, so you also need a windbreaker.
In close-up shooting, the depth of field becomes minimal even with a narrow ap-
erture. Sometimes only one part of the flower is in focus due to this narrow depth
of field, so you need to close the aperture down beyond f8 to obtain good results.
Backlight in photos of flowers is especially important. The clear color of petals or
the delicate veins of leaves cannot be expressed without backlight.
A flat photo taken with front lighting. (Left)
A vivid photo taken in backlight that shows the fine leaf veins. (Right)
185 Chapter 10
Even if the light quality is not really good,
you can emphasize the flower by selecting
an appropriate background. You can also
open the aperture for a narrow depth of field,
to arrange the background properly.
75mm ISO200 f3.3 1/160s
A photo taken with a 200mm telephoto lens to show dewdrops
shining in the backlight. ISO increased to 400 to counteract
shakiness, and shutter speed up to 1/750 sec.
200mm ISO400 f5.6 1/750s
Guide Book
Samsung SMART CAMERA NX System
60mm Macro ISO100 f22 1/125s
Insects appear as frequently as flowers in close-up photos. You can use the same
technique for insects as for flowers, but the difference is that flowers always stay
put whereas insects are always on the move. In order to take a photo of insects,
it is necessary to find out where the insects are likely to move and settle, and wait
there in advance. If we approach them when they have already settled, they may
move away.
The background selection is especially important for taking photos of insects. For
example, shooting a butterfly from above with the ground as background may not
make a great photo. For photos like this, you could set flowers or grass as the
background, at the same height as the butterfly, and shoot from slightly below, thus
setting the sky as background to get a beautiful photo. Bringing out the ecological
characteristics of insects in your shot - using what you have learned from close
observation - can create a vivid photo of nature at its most beautiful.
187 Chapter 10
An extremely close-up shot taken with a macro lens. The head of the dragonfly is
emphasized and the background is neatly arranged with a wide aperture and narrow
angle of view.
60mm Macro ISO100 f4.5 1/30s
Guide Book
Samsung SMART CAMERA NX System
Recently taking photos of food has become popular. Just looking at good food can
give us pleasure. Photos of food are usually taken in restaurants, but may easily
be blurred due to the dim lighting. For this sort of situation, use a moderately higher
sensitivity setting, place both your elbows on the table to secure the camera, and
take the photo.
In order to give food the best color, the white balance needs to be set correct-
ly, and it should be set according to the indoor lighting. Use the white balance
bracketing(WBB) function of the camera to take the photo.
Red indoor lighting tends to
create a reddish photo in the
auto white balance setting
(Left).
This photo was taken by
selecting incandescent light for
the white balance(WB) setting
(Right).
30mm ISO200 f2.8 1/60s
Chapter 10 189
Pay attention to the shutter speed when taking a photo of food indoors. It is
important to use an ISO800 setting to secure a reasonable shutter speed and
prevent blurring, and to adjust the white balance according to the indoor lighting.
30mm ISO800 f5.6 1/125s
The words you are searching are inside this book. To get more targeted content, please make full-text search by clicking here.
A useful guide to using and taking photos with the NX1000 camera
Discover the best professional documents and content resources in AnyFlip Document Base.
Search