Fashion Illustrations CHAPTER 5
STORY BOARDS
Chapter 5 takes you through a series of story
boards utilising knowledge gained from earlier chapters
and introduces Adobe Photoshop. Each story board
illustrates new ways to use your new skills.
● Male croquis development
• Hand drawing, tracing........................138 – 141
● Story board 1.......................................................142
• Digital photograph ............................145 – 144
• Adding effects to an illustration and
working with text ...............................145 – 147
● Story board 2.......................................................148
• Tee-shirts and placement prints .........148 – 150
• Downloading fonts and clip art....................151
● Story board 3.......................................................152
• Denim wash effects and colour
change ...............................................152 – 156
● Story board 4 – Adobe Photoshop ......................157
• Hand draw a fashion illustration ..................158
• Open a new file ............................................159
• Work area .....................................................160
• Tools panel ...................................................161
• Clean a scanned image.................................162
• Drag/copy the image into a new file ............163
• Magic wand tool ..........................................164
• Colour fill the garments ...............................165
• Gradient editor ..................................166 – 168
• Colour change of a scanned fabric.....169 – 170
• Colour sampling and layers
in Photoshop.......................................171 – 173
• Story board and edit background
photograph .........................................174 – 175
● Female croquis development –
hand drawing ......................................................176
● Story board 5 – Adobe Photoshop and
Illustrator.............................................................177
• Adobe Photoshop – duplicate and crop
the new file...................................................178
• Quick selection tool and layers ..........179 – 180
• Adobe Illustrator – place Photoshop
file ......................................................180 – 181
• Hair detail ....................................................182
• Technical drawings ...........................183 – 185
• Digital photograph editing ...........................186
• Compiling story board .................................187
● Story board 6.......................................................188
• Male croquis development and
variations of the poses in Illustrator...189 – 192
● Faces .........................................................193 – 195
● Summary.............................................................196
Note: some parts of headings or sub-headings may be
summarised.
137
MALE CROQUIS DEVELOPMENT – HAND DRAWING
Croquis – (Pronounced – kro–ke )
A French word meaning a rough sketch. Fashion designers have adapted this word to refer to the figurative templates
used to speed up the process of illustrating their designs.
The method used for developing a male or female croquis is very similar with some variations:
Female: Male:
• Slender • Smaller head and squarer jaw
• Leggy • Thicker neck and broader shoulders
• Torso tapered to narrower hips
• Well-defined muscles in arms and legs
• Thicker hands and feet
When taking a photograph of either a male or female you can give the illusion of height by positioning yourself
lower than the model. When choosing a photograph, the pose should emphasise the most important features. The
aim is to capture the fashion look but not to obscure the garment design. The photograph chosen has the figure in a
relaxed pose, the majority of his weight is on his left leg.
Equipment needed:
• Photograph of a figure
• Drawing board or table
• Tape
• Ruler or L-square
• Two sheets of tracing paper longer than the
photograph
• HB pencil
• Black felt–tip pen
• Eraser
• Scanner, computer and printer
Step 1: Select and prepare the photograph
• Select your photograph carefully keeping in mind
the garments you want to illustrate on it
• Tape the photograph to the drawing board
• Rule a line through the Pit of the Neck and at right
angles to the floor. This is the Balance Line
The tracing paper must be longer than the
photograph.
• Draw an identical line onto the tracing paper
138
TRACING
Step 2: Start to draw from the head down
• Place the tracing paper over the top of the
photograph and line up the axis on both sheets
• Starting at the top, draw in the head making it
smaller with a square jaw
• Move the tracing paper up a fraction and draw in
the neck and broaden the shoulders
• Draw in the outline of the torso, arms and hands
with well-defined muscles in the arms
Step 3: Draw in the legs to the knees
• Mark in the new position of the feet as indicated by
the horizontal line. In this instance there is a head’s
difference
Step 4: Draw in the legs to the feet
• Move the tracing paper up to match the position of
the feet on the photograph
• Make certain that the axes match
• Draw in the legs with well-defined muscles
The extent to which you elongate the figure depends
on the client you are working for and your style of
drawing, e.g. street wear or corporate uniforms. This
technique is not based on the 7½ heads to 8½ heads.
139
LIVE TRACE AND SHADING
Step 5: Re-draw the figure with a felt-tip pen
• Remove the photograph and place a second sheet of
tracing paper over the drawing
• Draw over the figure with a black felt-tip pen,
making certain that all lines are joined/closed
This is essential for the next process of scanning the
figure into the computer.
Step 6: Scan and trace the figure
Rectangle Tool (M)
Pen Tool (P)
• Scanning – each scanner is different (ref page 36-
37, scan, trace and expand the figure)
• Once the scanned image has been converted into a
vector image save and print the file
• If shading is to be added to the figure you can plan
this by rendering the printout
Note: keep in mind the light source.
Step 7: Test shading and skin tones
Before commencing to render the figure, test the
colours to be used. What appears on the computer
screen may be entirely different to the hard copy from
the printer. Each printer and different types of paper
will produce different results. It is therefore advisable
to test print the colours on the paper and printer to
be used in the final product.
a. Colour used from the Adobe Illustrator Swatch
Libraries Skintones
b. Colour the figure in the selected colour
140
FACIAL FEATURES AND HAIR
Step 8: Shading
Pen Tool (P)
• Use the hand rendering as a guide. Draw in the
basic shaded shapes – lightest tones first, using the
Pen Tool (P)
• Fill with colour and using the Transparency panel
set the Opacity to 50%
• Repeat this process using a degree of darker flesh
tone – transparency should stay at 50%
Step 9: Facial features and hair
Pen Tool (P)
• Draw in the facial features
• Draw in the hair
Once this technique is mastered it is advisable to
create a library of varying poses and styles of croquis
to speed up the process of producing finished artwork.
• Save this file and name it Male Croquis Library
141
STORY BOARD 1 – DIGITAL PHOTOGRAPH
Creating Story Board 1:
Story board 1 is made up of four layers
• Layer 1: Consists of the background photo taken
with a digital camera and opened up in Illustrator.
The colour is changed to grey tones and the Film
Grain effect is applied
• Layer 2: The garments are drawn onto one of the
croquis created in the previous exercise
• Layer 3: Is made up of technical drawings of
tee-shirts, colour applied and distorted with the
Scribble Tool. A description of each garment is also
added
• Layer 4: Colour swatches and text are drawn up
considering the layout of the composition
short sleeve v-neck tee colours mock layered long sleeve tee colours
short sleeve round neck tee colours
The JPEG (Joint Photographic Experts Group) is a compression format and is most commonly used in digital
cameras. Once loaded onto your computer you should save the image to a TIFF or AI file. If you close an image,
then reopen it and save it again as JPEG format, you apply a further compression. Save to JPEG format only after
you finish the composition.
Step 1: Open a new file and plan your layout
• Open the file with the image you plan to use as a
background image, copy this image into a new file
• File New
• The image may be much larger than the A4
printable page
• Plan the final composition, considering all elements
including fabric swatches, technical drawings and
mood photographs, which may be included in the
presentation. These can be done as rough sketches
by hand
• At this stage consider whether your final
presentation should be Landscape or Portrait
• If the page is to be bound as part of a book
allowances must be made for a wider margin on the
top or lefthand side
142
RASTERIZE AND GREYSCALE, FILM GRAIN
Step 2: Scale the image to fit into the layout
• Scale the image to fit the page considering the
planned layout
• Holding the Shift key will scale the image
proportionately, do not be tempted to drag or distort
a background image with a person in it
Step 3: Rasterize the photograph to greyscale
• Click onto Object in the menu bar
Rasterize
• Select Color Mode: Grayscale
• High (300 dpi)
• OK
By rasterizing the image first, your file will be smaller
than if you went straight into the next step.
• To adjust the tone click onto Filter in the menu bar
Colors Adjust Color
• An option box will appear
• Color Mode: Grayscale
• Select the Preview option ( ) and the Convert
option ( )
Adjust the tone by using the slide bar
Step 4: Film Grain
• Go to Effects in the menu bar
Artistic Film Grain
• Different effects can be achieved by experimenting
with the values in the Effects panel
• The illustrated effect was achieved with the
following values: Grain 4, Highlight Area 0,
Intensity 10, or you may wish to experiment with
the other effects: for example – Poster Edges
143
MASKING
Step 5: Crop the image with a mask
• Create a rectangle the size of the area to be masked
• Take note of the composition
• Marquee over the image and the rectangle
• Right click the mouse, a pop-up menu will appear,
select Make Clipping Mask (Ctrl 7/Cmd 7)
Save the file: Ctrl S/Cmd S
144
DRESS THE FIGURE AND LAYER
Step 6: Draw the trousers
Pen Tool (P)
Pencil Tool (P)
Direct Selection Tool (A)
• Create a new layer (Layer 2) following directions
outlined on pages 38 and 39
• Lock Layer 1 in the Layers panel
• From the croquis developed earlier, select one
appropriate to the garments you are illustrating and
the composition of your story board. Open the file,
copy it and paste it into the story board file
• It is preferable to lock the figure at this stage:
Object Lock Selection (Ctrl 2/Cmd 2)
• Draw in the shoes then the trousers. It is easier to
create shapes in the order that they are layered from
the back to the front
Step 7: Draw the tee-shirt
or
Pen Tool (P)
Add Anchor Point Tool (+) or Pencil Tool (P)
Direct Selection Tool (A)
• Draw in the bottom of the tee-shirt over the top
of the trousers and around the arms. Repeat this
process for the top section of the tee-shirt. Fill both
shapes with white and a black stroke ( ). Anchor
points can be added and manipulated to give the
effects of folds by using the Add Anchor Point
Tool (+) or use the Pencil Tool (N) (ref page 119)
• This garment shape will be used as the white accent
• Duplicate both sections of the garment and reduce
the width by scaling only the handles on the vertical
side of the bounding box
• Fill these shapes with the desired colour and
remove the outline. Place this back onto the figure
and if necessary adjust the shape using the Direct
Selection Tool (A). The white accent should be on
the opposite side to the shadow. Draw in the details
such as seams and top stitching
• Click onto Object Unlock All (Alt Ctrl 2/Alt
Cmd 2) to unlock the croquis
• Marquee over the whole figure, right click and a
pop-up menu will appear, select Group (Ctrl G/
Cmd G)
145
TEE-SHIRT WITH SCRIBBLE EFFECT
Step 8: Create a basic crew-neck tee-shirt
Pen Tool (P)
• Create a new layer (Layer 3) following directions
outlined on pages 38 and 39
• Lock Layer 2 in the Layers panel
• Select the Pen Tool (P) and draw a tee-shirt shape,
using the Male Croquis as a guide (ref pages 40 -
43, you can apply the same principles as the dress
to draw the tee-shirt)
• Move the tee-shirt off the croquis, fill with white
and no stroke ( ) a
• Duplicate this tee-shirt, fill with a colour and no
stroke ( ) b
• Duplicate again and remove the fill colour and add
a black outline. Add the hem and neckband details
using a stroke and no fill ( ). Marquee over the
tee-shirt and group it c
Step 9: Add a Scribble effect to the tee-shirt
Settings Custom Scribble Options OK • Scribble Effect – to give the appearance of marker
Variation: 0.88mm Cancel pen strokes, click onto the coloured tee-shirt and go
Angle: 147 to Effects
Preview
Path Overlap: 1.15mm Stylize Scribble
• The Scribble Option dialogue box will allow you
Line Options % Variation: 0 %
Stroke Width: 0.71mm to change the Angle, Stroke Width, Curviness and
Spacing
Curviness: 11 • Once the desired effect has been achieved, you can
save the settings in the Graphic Styles panel
Spacing: 1.41mm Variation: 0.71mm • This can be accessed through Window
GRAPHIC STYLES Graphic Styles (Shift F5)
• Drag and drop the shape into this panel
146 • To save this library for use in other files, go to the
Graphic Styles panel and click onto the arrow at
the top righthand corner to reveal the drop-down
menu. Click onto Save Graphic Style Library...
and name the file (ref page 104 – Understanding
Libraries)
• Move each shape on top of each other
a: white base
b: coloured scribble
c: black tee-shirt outline
Marquee over all shapes and group them (Ctrl G/
Cmd G)
• Draw up all styles and add the scribble effect
STYLISED TEXT AND COLOUR SWATCHES
Step 10: Create text and then ‘outline’ the text
basicTcolours Type Tool (T)
Tbasic colours • Create a new Layer (Layer 4)
Tbasic colours
• Lock Layer 3 in the Layers panel
• Create the text: ‘basic T colours’
• Highlight the text with the Type Tool (T) and
change the font to a suitable font, the font we used
here is bold, a
• To change the font size highlight the desired text, as
we have done with the ‘T’ go to the Character panel
and select a font size to suit your text, b
You can highlight all the lettering to do this or just
some of the letters.
• Select the text and click onto Type in the menu bar
Create Outline, c
• The words are automatically grouped
Step 11: Stylise the text
Selection Tool (V)
Rotation Tool (R)
• Change the fill colour to blue and no stroke ( ), d
• Copy the words once and put a black stroke and no
fill into it ( ), e
• Put the scribble effect into the blue lettering, place
the lettering on top of each other f
• Group the lettering and rotate the words with the
Rotation Tool (R), g
Layers 4 3 21 Step 12: Colour swatches
• Click onto the Rectangle Tool (M) and create the
first colour swatch ( )
• Copy this to the right for the last swatch, a
• Double-click onto the Blend Tool, an option box
will appear, go to Spacing, and select Specified
Steps 3 OK
• Blend the two colour swatches and then Expand
them (ref page 46–47), b
• Now Ungroup (Shift Ctrl G/Shift Cmd G) the
object, deselect by clicking away. Fill each swatch
with a colour. Marquee over the swatches and
group them again, c
• Copy this group for the other two tee-shirt colour
ranges
• The composition is now complete
147
STORY BOARD 2 – TEE-SHIRTS AND PLACEMENT PRINTS
cotton jersey, mock double Creating Story Board 2:
poloshirt with coverstitch hems
& front placement print Pen Tool (P)
Pencil Tool (N)
Story board 2 consists of tee-shirts using the Male Youth
Symbol Library and stylised using the pencil tool. Each
tee-shirt has a different placement print, using the same
elements to make up the whole print
cotton jersey tee-shirt with Step 1: Draw a basic tee-shirt
front impact placement print
• Either draw up new tee-shirts on the Male
cotton jersey tee-shirt with Youth Croquis or if you have created a library
front placement print as suggested on page 101 open the Male Youth
Symbol Library and select the short-sleeve tee-
SYMBOLS shirt; the rib neckband and the polo knit collar
Scale • Click onto the Break Link To Symbol icon ( )
Tolerances pixels OK Step 2: Pencil Tool options
Fidelity: 2.5 % Cancel
Reset • Double-click onto the Pencil Tool to reveal the
Smoothnes: 10 options
Options Preview • Fidelity controls how far the mouse or stylus
Fill new pencil strokes moves before a new anchor point is added to the
path
Keep selected
• The fidelity for this tee-shirt is 2.5. This means that
Edit selected paths every 2.5 pixels an anchor point is added to the path
Within: 12 pixels • The higher the fidelity, the smoother the line
• Smoothness controls the amount of smoothing that
is applied when you use the tool
• Keep Selected determines whether or not the path
remains selected after it is drawn
• Edit Selected Paths determines whether or not you
can change an existing path with the Pencil Tool
within a certain tolerance. This means how close
the cursor has to be before the selected line will be
altered
• For the purpose of this exercise this option must be
selected
148
PENCIL TOOL, PLACEMENT PRINT AND IMPACT PRINT
cotton jersey tee-shirt with Step 3: Adjusting the tee-shirt
front placement print
• Select the body of the tee-shirt and click onto the
LAYERS Background Layer Pencil Tool (N)
4 Layers Polo T Layer
Blue T Layer • Alter the side seams and copy the selected body to
Green T Layer the back (Ctrl C, Ctrl B/Cmd C, Cmd B)
LAYERS Polo T Layer • Select the front body and alter the hem
4 Layers Blue T Layer • Select the back body and fill it with a gradient
Green T Layer
Background Layer (ref page 116 – changing the colour, direction and
character of a gradient)
• You can do the same with the sleeves
• Place the stitch details onto the garment
Step 4: Create the key line around the tee-shirt
• Select the back body, the sleeves and the neckband
and copy and move these to the side, hold down
the Shift and Alt keys at the same time as moving
the selected shapes
• Do not deselect
• Click onto the Unite ( ) option in Pathfinder
• Place a Stroke around the finished shape and
increase the size of the stroke to approximately
6 pts
• Move this shape behind the tee-shirt and change the
fill and stroke to white as this is going onto a black
background
• Marquee over the whole image and Group (Ctrl G/
Cmd G)
Step 5: Layers and layer order
• Once the first tee-shirt and placement print is
finished, create two more new layers ( ) and copy
the green tee-shirt to them (ref page 61)
• You can now create the next two tee-shirts
• Create a fourth layer for the background image, we
have used elements from the placement print to add
interest to the background
• Select this layer and drag it below the tee-shirt
layers to be the first layer – the one at the bottom
• Lock the first and third layers ( ) and change the
colour of the tee-shirt in layer 2
• Go to Select in the menu bar
Same Fill Color (ref page 61)
• Change the colour of this tee-shirt to blue and in the
third layer change the colour to purple after locking
layers 2 and 3
149
ARRANGING AND COPYING LAYERS
a + b+ c = Step 6: Impact placement print tee-shirt
The placement print is made up of :
• A traced photograph, a; figures re–drawn with the
Pen Tool (P) over an image off the Internet, b and
downloadable free fonts from a font web site and
downloadable free windings from a font web site
(ref page 151), c
• The blue tee-shirt has an Impact Print on the front
A placement print is printed within the boundaries
of a garment piece. It is not full coverage and can be
printed on coloured base cloth.
An impact print is usually a 100% cover print, printed
from edge to edge on a white ground.
We have first created the print and then masked the
placement print with the front body shape (ref page
98–99)
Step 7: Polo-collar, mock-layered tee-shirt
• The polo tee was created using elements of the
impact print and adding a knit collar to the basic
tee-shirt
• Make a copy of the tee-shirt and change this to
white, a
• Ungroup the original and move the back aside, b
• Delete the back sleeves
• Lift the back neck to line up with the polo collar
that you created in your symbol library, c
• Cut out the front neck to accommodate the collar
• Make the front body and sleeves a little shorter to
show the layered effect, d
• We have put the knit collar and the pocket on top of
the placement print, showing that the tee-shirt was
printed before it was sewn, e
• Move all the components back together and group
them, f
Step 8: Arrange the tee-shirts on the background
• Unlock all layers except the background layer and
arrange the tee-shirts in place
150
DOWNLOADING FONTS AND CLIP ART
Downloading Fonts and Clip Art: Place the Font into the Font Library: – Apple OS
• Downloading free fonts is very easy; however, we • Download the desired font
would like to WARN you about the importance of • Apple OS will automatically expand it if it was a
familiarising yourself with copyright laws
compressed file
• Generally, when you download a font a Readme file • Double-click on the folder in the downloads folder
will be downloaded at the same time, click onto this
file and it will give you the conditions of use for to open the folder
that particular font • Double-click on the file with the .ttf extension
• This will automatically open Font Book
• Wherever necessary, buying the font is preferable • Font Book now displays a preview of the font
• Click onto the Install Font button on the lower
Download a Font:
right side of the window
• Open up your Internet browser and search for Fonts • A secondary Font Book window will open showing
• There are a plethora of ‘free’ font web sites – the
the new font file included in the list
one we find easy to navigate and which always has • Clear the original folder in the downloads folder
good fonts is Dafont (www.dafont.com)
• Follow the web site’s instructions on viewing and Clip Art and Windings:
downloading the font
• Clip art comes in a variety of file formats from
Place the Font into the Font Library: – Windows OS vector art through to TIFF Files – high-quality
bitmap files. Again it is important to take care with
• When downloading fonts from the Internet ensure the copyright instructions here – most web sites or
you select the correct file for your operating system publications will stipulate how these can be used
• The file extension or file name for a font is TTF • The following is a standard list – you must exercise
• The font will initially download in a compressed caution when using clip art
file format – this file will need extracting 1. You may use clip art in your school assignments
• It is important to download the font to a folder and projects
where you will be able to locate it again – like a 2. You may use clip art in your church brochure
folder in your work folder for Downloaded Fonts 3. You may use clip art for personal, non-commercial
a: Open up Windows Explorer and go to your uses
Downloaded Fonts folder, double-click on the 4. You may not use clip art to advertise your business
compressed file and you will be prompted to choose 5. You may not use clip art to create a company logo
a program to extract the file 6. You may not use clip art to illustrate the chapters of
b: The program will give you an option to extract
the file to a certain folder – the font will need to be a book
extracted to the Font folder in the WINDOWS OS
folder for it to be activated as a font • Windings are font files, but they contain clip art
This is the file path: images (refer to the Paisley on page 184)
My Computer/C–Drive/WINDOWS/Fonts
• Windings are downloadable in the same way as
• The font will be filed under the font name fonts
• To use windings, it is important to type out the
whole alphabet and Create Outlines (ref page 117)
• The images will be grouped
• Ungroup the images to use individual images
• You will be able to access it in the font list in
Adobe Illustrator or in any other program on your
computer
151
STORY BOARD 3 – DENIM WASH EFFECTS
Layer 3 Creating Story Board 3: Men’s Denim Jean Board
Layer 2
Layer 1 Story board 3 is made up of three layers:
• Layer 1: Consists of the background photograph
and the story board layout
• The background photograph is not edited and is
taken with a digital camera, opened up in Adobe
Illustrator, placed on the page layout in landscape
• Remember to change the font to a vector image
by selecting Create Outlines in the Type options
when you save the final story board
• Layer 2: Consists of the croquis illustration. The
croquis was developed from a photograph using the
same principles as the first croquis you developed
• Layer 3: Consists of the styling – the looser more
relaxed look was achieved by drawing the jeans
onto a basic croquis (ref page 102 for a male
croquis) and loosening it up with the Pencil Tool
• The following pages will focus on how to achieve
different washes and colours in denim
152
CHANGE THE DENIM COLOUR
Denim Jeans with Different Wash Effects:
The wash effect in this jean was created using a
Gradient Mesh. This tool has already been introduced
in a simpler form on page 126, which suited the
simpler shape of the shorts. For this more complex
shape a more detailed Gradient Mesh is required so
that the highlights appear softer.
• Open up the reverse side denim scan from page
126 or scan another denim swatch, the more texture
and contrast the better. Note the difference between
swatch a and b
This process requires a sharper contrast so it is best to
use the reverse side of the denim.
ab
Dark Wash Pattern Swatch: This treatment uses
swatch a with the following adjustments:
Step 1: Draw a rectangle
• Draw a rectangle on top of the denim scan with a
plain fill in it, this must be the depth of the colour
you would like the denim to be. Do not deselect this
rectangle
• Arrange the plain rectangle to go behind the denim
scan (Shift Ctrl [/Shift Cmd [)
• Copy and paste the rectangle, once more to the back
of the existing rectangle (Ctrl C, Ctrl B/Cmd C,
Cmd B),
remove the fill ( )
Step 2: Transparency panel
• Select the denim only and go to the Transparency
panel and select Luminosity (ref page 134 for an
explanation of Luminosity)
Step 3: Create the pattern swatch
• Select the whole swatch and drag this into the
Swatches panel
• Fill the illustration with the denim pattern fill
153
GRADIENT MESH
Step 4: Prepare the jean to apply the denim fill and
wash effect
• It is best to work on the half and then reflect the
jean once the fill and wash effects have been added
• This jean consists of the following components:
1. The back leg shape ( )
2. The back inside waistband shape ( )
3. The back folded in hem shape ( )
4. The front leg shape ( )
5. A line drawing only of the style details and belt
loops ( )
6. Top stitch details ( )
7. Highlight wash effects and folds ( ). These
were created using the Line Profile option
Width Profile 6 in the Stroke Panel (ref page
90) and then they were expanded to be fillable
shapes (ref page 96 for instructions on
expanding, the same instructions apply to these
lines)
Step 5: Separate the components
• Move the front leg style lines, stitch lines and style
details to the side
• Fill the back leg with the original denim swatch
scan ( )
• Fill the front leg, the back waistband and the back
hem with the altered colour denim swatch ( )
• Copy the front leg once to the side (remember to
use Keyboard Increment to move components, ref
page 14)
• Fill the copied front leg with a plain navy ( )
154
TRANSPARENCY PANEL AND ADJUSTING COLOURS
Step 6: Create the Gradient Mesh
• Go to Object in the menu, click onto
Create Gradient Mesh
• An option box with rows and columns will appear
More rows and columns in the image will give the
option for more detailed shading but this will make
your file much larger!!
• Type the number of rows and columns required in
the option box
• Select the Preview option to see what the mesh will
look like
• There is also a choice of Appearance
Flat: gives the option to select anchor points to
change
To Centre: highlights the centre of the shape and
To Edge: highlights the edges
• We have used To Centre in our example, to give
the appearance of a sandblasting effect
• The back waistband and hem turnback were
highlighted with the mesh tool from the tool box
(ref page 127)
Step 7: Transparency Panel
• Select each of the shapes that have the gradient
mesh in them
• Click onto the Transparency Panel and select Soft
Light from the drop-down menu
• The finished effect will look like dirty dark denim
This whole process is contingent on the paper and
printer used. It is good to experiment and print out
different colour combinations. You can then change
colours and transparency accordingly.
• Move all the components back on top of each other
and group them (Ctrl G/Cmd G)
• Continue on to complete the front view
155
DENIM WASH EFFECTS
Alternative Denim Colours and Washes:
• Swatch 1: This swatch has been illustrated and
consists of the following components:
1. Scanned denim swatch with colour change (ref
page 153)
2. Gradient mesh on top, this has a dark grey
colour with a transparency option applied to it
(ref page 155)
• Swatch 2: This swatch consists of the following
components:
1. Scanned denim swatch no colour change
2. Gradient mesh on top, this has a dark grey
colour with the transparency option Color Burn
applied to it (ref page 155)
• Swatch 3: This swatch consists of the following
components:
1. Scanned denim swatch with colour change.The
background plain colour should be a pale blue
and the transparency option for the denim scan
should be Soft Light
2. The gradient mesh on top, this has a deep navy
fill colour with the transparency option Soft
Light applied to it (ref page 155)
156
STORY BOARD 4 – ADOBE PHOTOSHOP
Creating Story Board 4: Adobe Photoshop
Story board 4 has been created in Adobe Photoshop
only. Through this story board we will introduce you
to some simple Adobe Photoshop functions and how
we apply them to creating story boards. Before you
start, however, you will have to do some preparatory
hand drawing.
Equipment needed:
• Photograph of a figure
• Background photograph
• Drawing board or table
• Tape
• Two sheets of tracing paper
• HB pencil
• Black felt-tip pen
• Eraser
• Scanner, computer and printer
This story board consists of three layers:
• Layer 1: is a plain white background (this can be
changed to a colour at a later date if needed)
• Layer 2: Consists of the background photo taken
with a digital camera and manipulated in Adobe
Photoshop to create a landscape image, not a
portrait (ref page 174 for this). It is then copied and
pasted into the story board file in a new layer and is
further edited, including a colour change suited to
the garment image
• Layer 3: Using the photo of the child, a line
drawing croquis is developed for this project
and future use. The figure is re-drawn including
the garments, hair and shoes. The line drawing
is scanned as a JPEG file, opened up in Adobe
Photoshop, cleaned up and coloured. Shading was
added as a separate layer and then incorporated into
Layer 3 once we were satisfied with the results
157
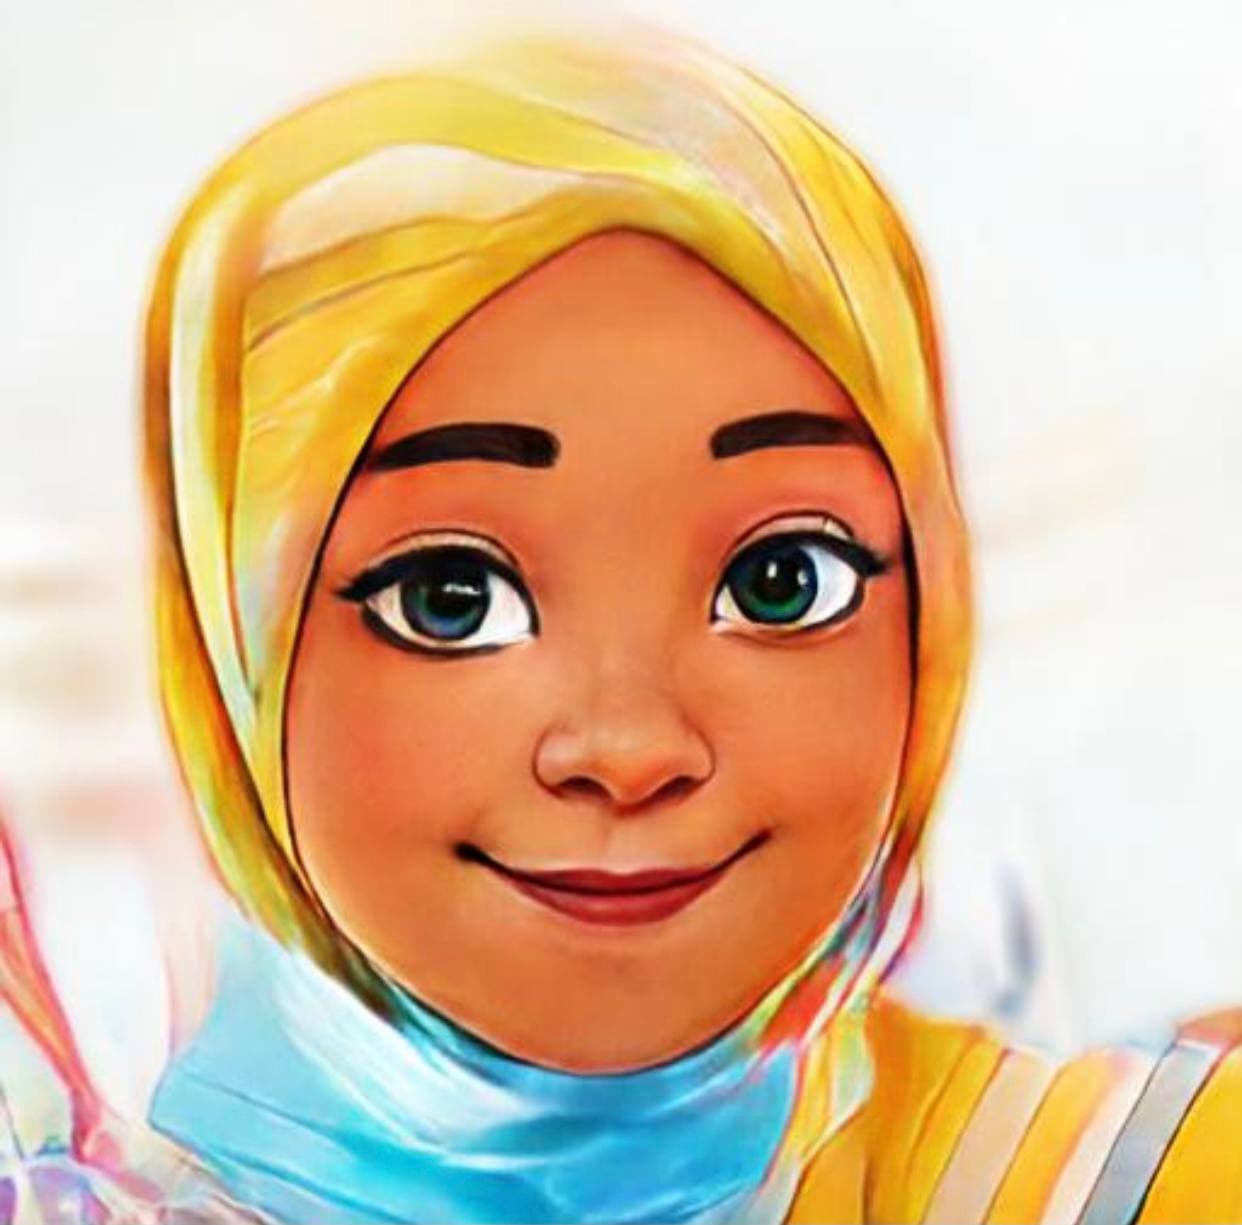
HAND DRAW A FASHION ILLUSTRATION
Step 1: Create a fashion illustration of a young girl
from a photograph
• We have used a photograph of a young girl who is
approximately five years old. Unlike the previous
method used on page138 - 140 there is no need to
elongate the figure unless this is your style
Tip: It is always easier to use an open pose as in our
photograph, this makes it much easier to develop
your croquis and it is easier to draw different styling
on the croquis.
• Following the preparation steps on page 138 you
will need to have a copy of the photograph you
are using printed out to suit an A4 story board and
some tracing paper to draw over the figure
• Once you have the basic croquis, you can remove
the photograph and draw a new figure including
garments. The original croquis can be kept to
develop further illustrations
• Draw over the dressed figure with a black felt-tip
pen, making certain that all lines are joined/closed
• The illustration can now be scanned
You can use the basic croquis to develop other
illustrations.
158
OPEN A NEW FILE
Clipboard Step 2: Open a new file in Adobe Photoshop
Default Photoshop Size
• Open the Adobe Photoshop program
U.S. Paper • Click onto the Adobe Illustrator icon to open the
International Paper
Photo program: Windows OS – Start up > All Programs >
Adobe CS5 > Photoshop
Web Apple OS – Applications > click onto the
Mobile & Devices PS icon once and then again when the
Film & Video dialogue box opens
Custom • Before you open a New File check that the
swatches at the bottom of the Tools Panel are set at
the Default Foreground and Background Colors
(D)
• Click onto File in the menu bar
New Ctrl N/Cmd N
• A dialogue box will appear
Preset: click onto the drop-down menu and set this
to International Paper
Size: A4
Width and Height can be transposed for landscape
view
Resolution: 300 pixels/inch
Color Mode: RGB
You can leave Advanced on the default settings
• OK
• Now save this file:
• Click onto File in the menu bar
Save File
Follow steps 1–4 on page 4 under ‘Saving a New
File
Format: Photoshop (psd)
Save the file
Step 3: Open the scanned illustration in Photoshop
• Click onto File
Open Files of types: All Formats/
Enable: All Readable Documents or/and JPEG
Click onto your scanned file and Open
• You now have two files open
It is advisable to save the file you are working on
every 10 minutes if you can (Ctrl S/Cmd S)
159
WORK AREA
Other open files
Arrange Documents: configures open files in different views (ref page 163)
Screen Mode: configures screen in different views Current working file name Select Workspace
Menu bar Essentials
Design
Window Painting
Photography
Arrange New in CS5
Workspace Reset Essentials
New Workspace...
Extensions Delete workspace...
Application Bar Actions F9
Options Adjustments
Annimation F5
Brush
Brush Presets F5
Channels F8
Character F7
Clone Source
Color Open panels
Historogram
History
Info
Layer Comps
Layers
Mask
Navigator
Notes
Paragraph
Paths
Styles
Swatches
Tools Presets
Applications Frame
Application Bar
Options
Tools
Summer dress and jacket OUTLINE.psd
Tools Panel: tools Close or
can be displayed side Close Tab
by side or a single Group
column as in this view
Expand panel/ • Navigator
Rulers: guide lines can be collapse to icons You can drag the zoom slider to the right to zoom
drawn out from rulers in, or to the left to zoom out. Each time you change
Zoom level the zoom level, the view in the Preview area
Show/Hide updates
switches between Panel menu Drag the red View box in the Preview area to move
showing and hiding quickly to different areas of the image
layers Create new layer
Lists the different Delete layer • Layers
image states – tools Layers allows you to keep various images separate
used in order of Panel menu so that you can make changes without deleting or
use Creates a new changing the underlying pixels. Each additional
Creates a new file snapshot, starting layer you create increases the file size of the image
starting from the from the current
current state state • History
Delete the current Every time you modify your image this is recorded
160 state in the History panel as a history state. The History
Panel menu panel records the last 20 states of the image. To
Lists color libraries delete a History state, drag the state into the Waste
Basket icon at the bottom of the panel
• Swatches Panel
This panel stores colour swatches
Delete swatch
New swatch
TOOLS PANEL
Set Up your Adobe Photoshop Workspace: Tools Panel (cont’d):
There are many new tools and features in Move Tool (V): You can move everything in a
Adobe Photoshop. In the following exercises layer with this tool or you can select an object with the
you will be using the basic ones that are quick but Marquee tool and then move it with the Move Tool
effective if you want to produce a catalogue or story
board. We have customised the workspace to include Rectangular Marquee (M)
the panels we will be using.
Elliptical Marquee (M): allows you to draw a
Go to Window in the menu bar and select the rectangle or an ellipse over the area you wish to select,
following panels: to move, cut out or delete
Navigator, Layers, History and Swatches
You can close all other panels by clicking onto the Magic Wand (W): selects continuous areas of
down arrow on the righthand side of the menu and colour, based on a Tolerance setting
going down the menu and selecting either Close
or Close Tab Group Quick Selection (W): this tool quickly paints a
You should also select Options from the Window selection using an adjustable round tip
drop-down menu. The Options panel shows you
the options of the current tool in use Lasso (L): allows you to use the cursor freehand
You can also click onto Applications Bar, this as if you were drawing with a pen. This option works
will show you what applications are available to best with a stylus pen
you from within Adobe Photoshop
Once all of this is established you can save your Polygonal Lasso: works by clicking onto the
workspace: work area, moving the cursor and clicking again.
• Click onto the down arrow to reveal the Continue until you have defined the area you want to
select. Click back at the start point to close the shape
drop-down menu and select New Workspace,
this will allow you to save this particular Patch Tool (J): the Patch Tool lets you repair a
workspace with your name. selected area with pixels from another area
• Having customised your workspace you can
choose to go back to the Essential workspace Crop (C): allows you to crop unwanted areas of
whenever you choose an image and reduce the file size
Tools Panel: Eyedropper (I): the Eyedropper tool samples
colour from the active image or from anywhere else on
The following is an identification of the different tools the screen
in the Tools Panel and where we apply the tools in this
book. Please note only tools demonstrated in this book or Brush or Pencil (B): the Brush Tool and
are represented. the Pencil Tool paint the current foreground colour on
an image. The Brush tool creates soft strokes of colour.
• As in Adobe Illustrator some of the tools have The Pencil tool creates hard-edged lines
fly out menus, unlike AI you cannot tear these
off, they will open when they are in use Clone Stamp (S): allows you to copy part of an
image and apply it to another part of the image at the
same time
Eraser Tool (E): This will rub out parts of an
image
Paint Bucket (G): Drops a fill colour into a
closed area
Gradient (G): Fills an area with a gradation of
colour
Hand Tool (H or space bar): use the Hand Tool
in addition to using the scroll bars to move around the
image
Zoom (Z): allows zooming in and out of your
image
161
CLEAN A SCANNED IMAGE
Step 4: Refine and clean the scanned illustration
Zoom Tool (Z)
Eraser Tool (E)
Clone Stamp Tool (S)
You have a new file open and the scanned illustration
file open. We are going to clean up the scanned image
and once this is done we will copy or drag this image
into the new file.
• It is best to zoom up very close to the drawing
when you do this
• Zoom (Z) right up to the image and either use the
Eraser Tool (E) or the Clone Stamp Tool (S)
• When the image is enlarged you can move around
the screen with either the scroll bars, the Hand Tool
(H) or the Navigator panel, use the slider to zoom
in and out
• Zoom Tool (Z): Select the Zoom Tool (Z) and
press and hold down the right mouse button and
move it over the image, moving the mouse down
will enlarge the image ( ) and up will diminish
the image ( ). You will need to use the space bar,
activating the Hand Tool to navigate around the
image (Apple OS)
• Select the Zoom Tool and marquee over the area
you want to zoom up to (Windows OS)
• Eraser Tool (E): The size of the Eraser Tool (E)
can be varied either in the Options bar where the
hardness and size of the eraser can be varied. The
size is denoted by a circle on your artwork, pressing
down will activate the eraser
• Clone Stamp Tool (S): You can use this tool to
copy a line. Select the Clone Stamp Tool (S) and
‘target’ an area to ‘clone’ by holding down the Alt
key and simultaneously clicking onto the target
area, release the mouse and move up to the area
where you would like to draw the ‘cloned’ line,
within the brush size indication you will see a
preview before you click and hold down the mouse
to draw
• Each operation or state you perform will be
recorded in the History panel
• By default, when you open a document Photoshop
creates an opening snapshot of the image
• Active State: this is usually the last operation
performed and is highlighted in the panel. By
selecting an earlier state and going on with a new
operation, you can effectively undo all subsequent
operations. You can delete a History State by
dragging it into the delete bin ( )
162
DRAG /COPY THE IMAGE INTO A NEW FILE
Free Transform symbol Step 5: Copy the illustration into the new file you
Save the file: Ctrl S/Cmd S have just created
Move Tool (V)
Marquee Tool (M)
• Now that you have cleaned and edited your scanned
illustration you can copy this image to the new file
you created at the start of this exercise
• We will select the image and drag it into the new
file. To drag the image both files must be open in
floating windows next to each other
• Go to Arrange Documents in the Options bar and
click onto the down arrow
• A window with different views will come up, click
onto the ‘2 Up’ view. Both files will be in floating
windows next to each other
• Select the layer the image is on in the Layers panel,
in the scanned illustration file it will be the only
layer (Background). Marquee over the illustration
and click onto the image with the Move Tool (V)
and drag the image from the scanned original file to
the new file
• There is a New Layer, Layer 1, in the file
• The best results will occur when the new file
resolution and the scanned image resolution are the
same size to maintain the clarity and integrity of
the illustration. We have scanned our illustration at
300 dpi (ref page 36, scanning) and the new file we
created was 300 dpi. The instructions were to create
the illustration to suit an A4 portrait layout
• It is still possible to scale the image in the new file.
Click onto Edit
Free Transform (Ctrl T/Cmd T)
• The Free Transform options are now in the
Option bar. Select the Link symbol ( ) to ensure
that the width and height are relatively proportioned
when you transform the image
• Move the cursor over any of the corner boundary
box anchors and a double arrow will appear, hold
the left mouse button down and drag to scale the
image
• Move the image by placing the cursor in the centre
of the transformation boundary box and drag it into
position
• Once you are satisfied with the results complete
the task by pressing the Enter/Return key
Alternatively double-click inside the transformation
boundary box
• The illustration is in a new layer and you are ready
to start colouring the image
163
MAGIC WAND TOOL
Step 6: Delete the background in the new layer
Magic Wand Tool (W)
• As each new layer is created it is best to identify it
with a name:
Double-click inside the layer name box and re–
name the layer, Scanned girl, flat colour
Delete the area around the illustration in this layer:
• To begin, turn the Background Layer off by
clicking onto the eye symbol ( ) next to it
• This will leave the next layer, Scanned girl, flat
colour, on a floating transparent background
• Click onto this layer to make sure it is selected
Tip: always make sure you are in the layer you want to
change before you do anything in PS.
• Select the Magic Wand Tool (W), check the
Options bar information:
Tolerance should be 10%
Anti–alias should not be selected ( ), this blurs
the edges and makes colour changes at a later stage
difficult
Contiguous should be selected ( ) for this step as
we only want to delete colour outside the figure not
inside
• Click onto the area surrounding the illustration,
hold Shift key and click onto the negative areas
within the illustration such as the space between
the legs and the arms and the body. Note how a +
symbol sits next to the Magic Wand symbol when
you hold down Shift, pressing Shift will select
more than one area at a time
• Now press the Delete key to delete this colour
• The figure is now ready to be filled with colour
Step 7: Colour fill
Paint Bucket Tool (G)
• The illustration is floating on the top layer
• You can change the colour of the background layer
by selecting that layer
• Select a colour from the Swatches panel, now
select the Paint Bucket Tool (G) from the Tools
panel and hover the tool over the background area
and click to drop the colour into the Background
layer
164
COLOUR FILL THE GARMENTS
Step 8: Add flat colour to the illustration
Paint Bucket Tool (G)
• First select the layer that the illustration is on
(Scanned girl, flat colour)
• Select your colours, you can choose colours in a
few different ways:
As you did with the background select colours
from your Swatches panel. We have selected a
flesh tone from the Default colours. The colour
was too peachy so we adjusted it with the
Color Picker option box
You can open the Color Picker by clicking
onto the foreground colour in the swatches at
the bottom of the Tools panel. This opens an
option box that will give you the opportunity
to select from a range of colours. You can then
add tints or tones to that colour. We have added
a tint to the original flesh tone we selected,
you will notice the swatch on the side that
contains the current selection as well as the
new adjusted swatch. Save the new swatch
by closing the Color Picker. The new swatch
is in the foreground swatch and you can now
load the swatch by dropping it into the Swatch
panel. You have the option to name the swatch
now
In the same option box you also have access
to Color Libraries. The standard print-based
colour libraries are listed when you click onto
the Color Libraries drop-down menu options
• Select all the colours to fill this illustration
• Select the Paint Bucket Tool (G), hover over the
area to be filled and click
• If you have any holes in the lines of the drawing the
colour will ‘bleed’ into another area
• You can block that hole and fill the area again (ref
page 162)
• Once you have selected the colours and filled each
area you can deselect the Paint Bucket Tool by
selecting the Move Tool (M). In Photoshop we use
the Move Tool (M) as the default tool
• If you did not save a previous colour used into the
Swatches panel all you need to do is Eyedrop that
colour to select it and then go back to the Paint
Bucket tool
165
GRADIENT EDITOR
Step 9: Creating a customised gradient swatch
Gradient Tool (G)
• Create a new layer for the hair and skin tones, name
it accordingly
Gradient panel: Once you have selected the Gradient
Tool (G) the Options bar will display the tool, a
graded bar consisting of the colours in the Foreground
and Background swatches in the Tools panel and the
option of choosing Linear, Radial, Angle gradient, etc.
styles
Rest the cursor on the inside of the gradient sample
in the Options bar and click to reveal the Gradient
Editor. Here we can create new gradients
Select the Stop ( ) below the gradient bar, note
how the colour of the point changes from white to
black and the present colour shows up in the Stops
section of the Gradient Editor, you can edit or
change the colour
We have selected the flesh colour created on page
165 for the first stop by clicking onto that colour in
the swatches panel
Moving to the middle Stop we have selected the
colour again but have double-clicked this Stop to
bring up the colour picker where we have changed
the colour to a lighter tint
The third Stop has used the same flesh colour, but
this time it is darker
Once the gradient is created, click onto New and
name the new gradient, Skin Tone
For the hair gradient we have used a combination of
three colours and moved the Stops along the slider
to get more brown into the gradient. Click onto
New and name the new gradient, Hair Colour
If you are printing the illustration out on paper
always check the colours with the printer and paper
medium you are using as these impact on the colour.
You can save these two new gradients into a library
by clicking onto Save in the Gradient Editor. You
will be directed to a gradient file directory where
you can type in the new name of this file and save it
This library can be opened another time by clicking
onto Load, this will open up all your saved gradient
libraries. You can add to this library each time you
create a new gradient and save over the first library
to save the changes
166
APPLYING THE GRADIENT
Step 10: Apply the gradient swatch to the skin and
hair
Magic Wand Tool (W)
Gradient Tool (G)
Linear Gradient • Create a new Layer by clicking onto the Create
a new Layer ( ) icon at the bottom of the Layer
Panel. Rename this new layer to identify the task,
Flesh and hair shading
• Click back onto your original drawing layer in the
Layers panel
Note: this is your master layer for all future layers, be
careful not to edit this layer, always remember to go
back to the layer you are working in.
• Select the Magic Wand Tool (W), check the
Options bar information (ref page 164) and click
onto one of the limbs
• Once this is done select the new layer, ‘Flesh and
hair shading’
• Click onto the Gradient Tool (G)
• Click the down arrow on the side of the gradient
sampler in the Options bar to reveal the gradient
swatches
• Select the new Skintones gradient and the Linear
gradient option to the right of the sampler
• Click and drag the cursor over the selected area.
Whilst dragging over the area, you do not have
to stay within the selected area, you can start by
clicking outside the area to achieve the desired
effect
• Be careful to pay attention to the light source, in
this illustration it is on the left
• Deselect the area Ctrl D/Cmd D
• Go back to the ‘Scanned image with colour’ layer
again, using the Magic Wand Tool (W) select
another area
• You will have to add shading to each of the skin-
coloured areas. Each time select the area in the first
layer and then add the gradient in the next layer.
Experiment with the various gradient options and
the angle you drag the Gradient Tool
• Following are the other four options:
• Radial Angle Reflected Diamond
Save the file: Ctrl S/Cmd S
167
GRADIENT EDITOR AND TRANSPARENCY
Step 11: Gradient swatch with transparency
Gradient Tool (G)
• Create a new layer for the garment shading and
name it accordingly
Gradient panel: Editing the transparency values of a
gradient swatch
Make sure that there is the same colour in both the
colour swatches on the gradient slider ( )
Select the Stop ( ) above the gradient bar, note
how the colour of the point changes from white to
black and the present colour shows up in the Stops
section of the Gradient Editor, you can edit the
transparency value of the opacity to 50% ( )
Moving to the lefthand Stop change the opacity
value to 0% ( ). Note how the stops change colour
to reflect the opacity value
Once the gradient is created, click onto New and
name the new gradient, Black or White opacity
We have created a black and a white opacity
You can save this swatch library over the first
swatch libraries, select Save in the Gradient
Editor and save the library as the same name to add
the new swatches to this library
The reason we use a transparency in the gradient is
to allow you to create different colour combinations
of the same styles and you will not have to re-create
the gradient using specific colours to suit each colour
combination.
Follow the instructions on page 167 to do the
shading in the garments. Experiment with the
Radial Gradient
We have illustrated a plain garment with the
shading and a patterned garment with the same
shading. Note the layer order and the new style
added below the shading layers
168
COLOUR CHANGE OF A SCANNED FABRIC
When considering a print for your garment, inspiration Step 12: Select the colour to be changed on a
can be found on the Internet. Log onto the Internet and scanned fabric
type your criteria into your search engine, e.g. repeat
pattern designs, the choice is endless. There are a few Marquee Tool (M)
WARNINGS: all designs will have copyright issues.
These are usually about permission for end use, check • Either method used, must be saved as a JPEG file
this before using the design. The other major issue will • Any changes to be made must be completed before
be resolution, these images are usually low resolution
if they are free. When selected, either download file or you use the fabric swatch in your story board
copy the image into Photoshop. Alternatively scan in a
piece of fabric. • The following instructions will guide you through
changing the background colour of a simple spot
Select A design:
D
All D • Open the fabric swatch file in Photoshop and make
Deselect I a copy of the file. Go to Image in the Menu bar
Reselect
Inverse Duplicate
• Close the original file and work on the duplicate file
All Layers A
Deselect layers Marquee over the whole of the image with the
Similar Layers Rectangular Marquee Tool (M)
Click onto Select in the Menu bar
Color Range
Color Range
Refine Edge... R
Modify
Grow
Similar
Transform Selection
Edit Quick Mask Mode
Load Selection...
Save Selection...
A dialogue box will appear. Arrange your work area
to be able to view the dialogue box and your image
together
Select the middle eyedropper ( ) from the choice
of three below the Save option. Click onto the
scanned image with this to activate the options in
the dialogue box
Move the Fuzziness slider to 200 and the Range
slider to 100%
Activate ( ) Selection
Leave the Selection Preview on None
Note the lighter section in the preview image of the
dialogue box, this is where you have clicked the
eyedropper. Continue to click onto different areas
of the scanned fabric until as much as possible of
the grey shaded area turns white
Once the background is all selected click onto OK
169
COLOUR CHANGE SCANNED FABRIC
Step 13: Change the colour
or
Brush Tool or Pencil Tool (G)
Crop Tool (C)
• Once you have clicked OK the Color Range
dialogue box closes and you will notice that all the
background colour is selected
• Select the new background colour ( ) from the
Swatches panel and click onto either the Brush
Tool or Pencil Tool (G). Set the size of the Brush
Tool to a large size by pressing the brackets keys,
the left bracket (]) for larger and the right bracket
([) for smaller
• Colour over the selected area
• Click onto the Crop Tool (C) and marquee over the
newly coloured area and then crop the print
• Press Enter to finalise the action
• Save the file: Fabric Scan
Step 14: Copy the fabric into the storyboard file
Move Tool (V)
Marquee Tool (M)
• You will need to have both the new fabric swatch
file open and the coloured illustration file open
side by side (ref page 163, floating windows, 2
Up)
• Click onto the ‘Scanned girl, flat colour’ layer
and make a copy of it by dragging it into the New
Layer ( ) symbol at the bottom of the layers
panel
• Click onto the layer that the fabric is on in the
changed fabric colour file
• Marquee with the Marquee Tool (M) over the
whole swatch and then select the Move Tool (V) to
copy the fabric to the illustration file
Note:the copied fabric will immediately create a new
layer above the layer that was selected, in this case
the ‘Scanned girl, flat colour, copy’. If this did not
happen simply click onto the fabric layer and move
it into position, above the copied flat colour layer as
illustrated.
• You can scale the fabric swatch to suit the size of
the illustration (ref page 163)
170
COLOUR SAMPLING
Step 15: Sample colours from the scanned swatch
Eyedropper Tool (I)
Paint Bucket Tool (G)
• Zoom in close to the scanned swatch and sample
two colours from the fabric with the Eyedropper
Tool (I)
• You can toggle between the Foreground colour and
the Background colour by pressing ‘X’
• Both the colours we have selected look a little
dirty so we have double-clicked onto the colour
to open the colour picker (ref page 165) and have
brightened up each of the colours
• Once that is done the new swatch was loaded into
into the Swatches panel
• Click back onto the ‘Scanned girl, flat colour, copy’
layer and fill the areas with the new colours with
the Paint Bucket Tool (G)
• Hide the fabric layer, Layer 1 ( )
Step 16: Select a single colour on a layer
Magic Wand Tool (W)
• Select the Magic Wand Tool (W), check the
Options bar information:
Tolerance should be 10%
Anti–alias should not be selected ( ) (ref page
164)
Contiguous should not be selected ( ) for this step
as we want to select all the blue on this layer
171
SELECT INVERSE
Step 17: Filling the dress with the scanned swatch
• Click back onto ‘Layer 1’
• Go to Select in the menu bar
Inverse
• This will select the areas outside the initial area
selected
• Press Delete to delete the scanned swatch outside
the dress area
• Now you can merge the two layers
• Select the ‘Scanned girl flat, colour layer’ hold
Ctrl/Cmd key down to multi select and click onto
‘Layer 1’
Merge Layers:
• Go to Layers in the menu bar
Merge Layers Ctrl E/Cmd E
Save the file: Ctrl S/Cmd S
172
MERGE LAYERS AND CREATE A NEW FILE
Step 18: Merge layers and make a copy of the
illustration
Move Tool (V)
• At this stage the illustration is made up of several
layers
The following instructions will guide you through
merging selected layers onto a new layer whilst still
keeping the original separate layers:
• To Merge Visible layers you can go through the
menu options (ref page 172), but we want to merge
visible AND create a copy (‘merge and stamp
layers’ ref Photoshop Help menu), this can only be
done with keyboard shortcuts
• Prepare your Layers panel. We have hidden the
layers we do not want to include in this merge,
the ‘Background’ layer and the ‘Scanned girl,
flat colour’ layer, by clicking onto the Hide and
Show eye symbol ( – ) next to the layer in the
Layers panel. Once this is done Click onto the keys
Shift Ctrl Alt E/Shift Cmd Alt E
• Using the Move Tool (V) drag the merged image
aside. You now have two images, one several layers
and the other image is made up of one layer (this
image will be difficult to edit, this is why we keep a
copy of the separate layers)
• The original image and its layers are saved at this
stage for future reference if needed. Too many
layers will increase file size and can slow down the
program and therefore it is recommended that these
layers are deleted at a later date when not needed
• Save this file and leave it open for the next steps
Step 19: Select a photo and open a new file
• It is essential that the photo used for the background
is chosen carefully to create the mood intended
• Open the photograph file in Photoshop
• Create another new file (ref page 159)
• For this story board we are using a portrait
orientation
• OK
• Save this file and name it
• You now have three files open in one window
173
PREPARING THE STORY BOARD
Step 20: New view and move the photograph and
illustration to the new file
Move Tool (V)
It will be easier to move or copy the images from one
file to another with each of the three files in floating
windows.
• Change the view to 3 Up (ref page 163), it would
be easiest to have the layout of the three files as
illustrated
• Click onto the photograph with the Move Tool (V)
to select it and move it over to the new file
• Do the same with the merged illustration layer in
the figure file
• Once the three files are assembled in the new file,
there is no need to view the photograph and figure
files
• With the new file selected, click onto Arrange
Document in the Options bar and select
Consolidate All
• Scale both images to suit the layout (ref page 163)
• We would like the photograph to go the full width
of the page so we have duplicated it
• You could use a number of methods to achieve this
end:
a: stretch the photograph across the page – not
appropriate if there is a figure, or in this case the
bicycles
b: use the Clone Stamp Tool (S) to duplicate
selected areas. (The Clone Stamp Tool is used in
the next story board to remove parts of an image,
ref page 178)
• Hide the layer that the illustration is on (ref page
173)
Copy an image in the same layer:
• Marquee over the photograph with the Marquee
Tool (M)
• Click onto the Move Tool (V) and hold the Alt
key down until you see the double arrow, move the
image over to the side, we have lined the shadow of
the sidewalk up to make it continuous
174
EDITING THE BACKGROUND PHOTOGRAPH
Step 21: Edit the photograph to suit the layout
Lasso tool (L)
a: works like a pencil, b: works by clicking from • We will further edit the photograph softening the
just draw around the anchor point to anchor edges using the Lasso tool (L) to select the edge of
area you wish to select point in straight lines. To the photograph
and it will close the close a shape either click The Lasso Tool is another way to select areas of an
shape once you release back onto the start point image, as was the Quick Selection and Wand Tool.
the cursor or press Enter We would recommend two of the three variations of
the Lasso Tool:
a: the Lasso Tool ( ) allows you to use the
cursor freehand as if you were drawing with a pen,
a stylus pen is beneficial here
b: Polygonal Lasso ( ) works by clicking onto
the work area, moving the cursor and clicking again
in short straight lines until you have selected your
area
Select the Lasso tool (L) and check the finish
you require in the Options bar. For this image we
have selected Anti–alias, to blur the edges slightly
when working with fine gradation of colour as in a
photograph. The Feather is set at 50px to achieve
the fade–out effect at the edge of the photograph
Starting at any point of the photograph draw around
the area you want to retain, ending back at the
beginning. Note that even though the photograph
layer is being edited the illustration layer is visible.
This enables you to view the composition as a
whole
• If at any stage you are not happy with the shape,
click outside to deselect and start again
We then select Inverse (ref page 172) and press the
Delete key to delete the edges of the photograph
In this example the background photograph is quite
dark for the overall composition. There are many
methods that can be used to change this
• To achieve the result in our example, select Image
in the Menu bar and from the drop-down menu
select Adjustments Brightness/Contrast.
Keep Preview ticked ( ) and adjust the brightness
and contrast on the slidebar until it suits the
composition
The lips were added once the composition was
completed to tie in with the overall mood of the
storyboard. Like the croquis, a library of scanned
features has been saved for future reference. The
JPEG file has been copied and pasted into this file
and positioned and scaled to the desired size. The
new layer is then merged with the figure layer
175
FEMALE CROQUIS DEVELOPMENT – HAND DRAWING
Hand Trace the Figure and Elongate:
• The technique used to develop the female croquis
is identical to those used for the male croquis with
two exceptions, the figure will be slender and more
leggy
• As fashion changes, different areas of the body are
emphasised
• For example:
High-heel shoes – longer legs
Fur or roll collars – longer neck
Padded shoulders – wider shoulders
• Whatever proportion is used, it is essential to draw
in the Balance Line
• Refer to pages 138 to 140 for drawing instructions
• You can add to your library of croquis by using
your original croquis as a reference. The examples
shown here are all identical proportions and slight
variations to the movement through the torso. The
main change is the leg positioning and thus the
weight of the body changes
a: The weight–bearing foot is the closest to the
Balance Line and in line with the Pit of the Neck
b: The weight of the body is distributed between
both feet with extra weight on the left ball of the
foot.
c: The weight of the body is evenly distributed
between both feet
ab Save this file and name it Female Croquis Libary.
c
176
STORY BOARD 5 – ADOBE PHOTOSHOP AND ILLUSTRATOR
Creating Story Board 5:
Adobe Photoshop
Adobe Illustrator
• This story board is achieved using both Adobe
Illustrator and Adobe Photoshop
• Each section is created as a separate file and then
brought together in this composition as separate
layers. This method is used due to the large size of
the files
• Layer 1: Consists of the background photo taken
with a digital camera and edited in Adobe Illustrator
• The image is traced and changed from a bitmap
image to a vector image
• The Paisley pattern fill is created and applied as a
block of colour
Saved as: Story Board 5 Fashion Illustration and
Technical Drawing
• Layer 2: Each technical drawing is created using
information covered in the previous chapters
Saved as: Technical Drawing
• Layer 3: Using the photo of the girl, the
background is edited out in Adobe Photoshop.
This is then opened in Adobe Illustrator and
placed onto a croquis which has been previously
developed
Saved as: Figure and garment
As each file is completed in Adobe Illustrator, save
as an individual file, copy and paste it into the Story
board 4 Fashion Illustration and Technical Drawing
file.
.
Note: Before pasting, create a new layer each time.
177
ADOBE PHOTOSHOP – DUPLICATE AND CROP THE NEW FILE
Step 1: Create a duplicate file
• Open the JPEG or TIFF file from the digital camera
• Immediately make a copy of the file by going to the
menu bar and select Image
Duplicate
• Close the original file
Step 2: Crop the image
Crop Tool (C)
• Click onto Crop Tool (C) and drag the tool across
the area you want to frame
• Double-click on the image or Enter to crop it
• Go to File in the menu bar and save the file
• Save As (Shift Ctrl S/Shift Cmd S)
• Name the new file ‘Garment Photo’
Step 3: Remove the jewellery from the photo
Clone Stamp Tool (S)
• Following the Clone Stamp Tool instructions on
page 162 remove the jewellery
• When using the Clone Stamp Tool on a photograph
it is best to use a brush with a softer blurred edge
• In this photo we had to be mindful of the pin-tucks
on the front of the blouse following through over
the jewellery
• Note how we have removed the jewellery from
around the neck at the collar and cloned the light
along the fold of the collar
It is very helpful to keep an eye on the preview within
the brush.
178
QUICK SELECTION TOOL
Step 4: Select the garments only
Quick selection Tool (W)
Before we can bring together the hand-drawn figure
and the photo of the garment, we need to edit out the
figure and background to separate the garments from
the rest of the photograph.
• Use the Navigator panel to get a full view of the
garment. The slider underneath the thumbnail
zooms in and out of the image (ref page 160)
• Select the Quick Selection Tool (W) this is located
in the fly-out menu under the Wand Tool. The
Quick Selection Tool works like a paintbrush, but
instead of painting a colour, you are selecting an
area of the image
• ‘Paint’ over the area you want to select. The
tolerance of how much you select is linked to the
brush size, a larger brush size has less tolerance and
will pick up tones with less discrimination than a
smaller brush size
• To change the brush size, click onto the Brush
pop-up menu in the Option bar and type in the size
or drag the slider. Alternatively press the Right
Bracket (]) to increase the Quick Selection Tool
brush tip size and the Left Bracket ([) to decrease
the brush tip size
• Paint inside the image. The selection grows as
you paint following the contour of the image.
We suggest that you paint over small areas and
release your mouse between each one. When you
start to use this tool the default selection is: Add
to selection ( ) indicated by a + sign within the
brush
• If an area is selected by mistake hold down the
Alt key to change the Quick Selection Tool to
Substract from selection ( ) indicated by a - sign
within the brush and continue to paint the unwanted
area to remove it from the selection
• Release the Alt key to go back to the default option
()
• Continue painting with the Quick Selection Tool
until you have covered all of the areas you want to
select
• To improve the quality of the selection click onto
Refine Edge in the Option bar
• A drop-down menu appears
• The selected image is highlighted, we have selected
On White (W)
• You can view the alternatives, click onto the down
arrow in the View mode and a drop-down menu
appears
179
QUICK SELECTION AND LAYERS, PLACE FILE
Step 5: Save Quick Selection option and save the file
Selection This example shows The refine edge dialogue box does just that, it refines
Layer Mask the file opened in the edges of the selected area. You will now be able to
New Layer Illustrator and saved view your cut-out photograph and adjust the edges to
New Layer with Layer Mask as directed above, i.e., your satisfaction.
New Document the cut-out garments
New Document with Layer Mask are on a transparent You have the choice to adjust the following options:
background.
This example shows • Smooth: this will smooth out any bumps along
the file opened the edge
in Illustrator
and saved with a • Feather: depending on the settings, this can vary
white background from a mild blurring of the edges to an area of
layer showing in fading around the edges
Photoshop. This is not
correct as we cannot • Contrast: this sharpens the contrast of the edge
put the figure behind • Shift Edge: will move the edge in or out from the
the garments.
original selection
180
• Selection: we have chosen New Layer This
saves the selection onto a second layer with a
transparent background. Hiding the original
Background Layer. This is perfect for what we
intend to do with this edited photograph
• Save the file
It is important to save the original file with the layer
that you want to use in the story board visible and on
a transparent background, as in the example.
Step 6: Place the Photoshop file into Illustrator
We Place the Photoshop file into the Illustrator file
so that we can still edit that file if need be and it will
change the image in Illustrator.
• Open up a new A4 portrait file in Illustrator.
Remember to Show Grid (ref page 6)
• Go to the menu bar File
Place
• This will open your directory. Select the
photograph you have just edited and it will open
up in the file you have just created
• You can scale it to suit your layout
• If you need to edit the file, simply go to the menu
bar, click onto Edit
Edit Original
this will open the file in Photoshop
• Once the file is saved, the additional edits will
appear in Illustrator
• Save this file ‘Figure and Garment’. Do not close
this file
ADOBE ILLUSTRATOR – LAYERS
LAYERS Step 7: Copy the figure into the new file
Garment 1 • Open up the file with the figure you developed
earlier ‘Female Croquis Library’ and select the
1 Layers female figure that was drawn from this photograph
LAYERS • Marquee over the figure with the Selection Tool
(V) and copy it Ctrl C/Cmd C
Figure
Garment 1 • Go back to your ‘Figure and Garment’ file: you
will see open files just below the Control panel
2 Layers (ref page 8) or go to Window in the Menu bar
and at the bottom of the drop-down menu you will
LAYERS see all your open files listed, select the file you
want
Garment Photo
Figure • Rename the first layer ‘Garment 1’
• Create a new layer and name it ‘Figure’
• With the figure layer still selected paste the figure
from the croquis library (Ctrl V/Cmd V) into this
file, do not deselect
• Lock the first layer ‘Garment 1’ by clicking
onto the second square in the Layers panel and a
padlock will appear (ref page 39, About Layers)
Step 8: Scale the figure
• Using the Selection Tool (V) and the Shift
key, proportionately scale the figure to suit the
photograph
Step 9: Change the layer order
• Click onto the layer ‘Figure’ in the Layers panel.
Hold the left mouse button down and drag this
layer below the ‘Garment Photo’ layer. This
places the figure behind the garment
2 Layers
Zoom For Det ails
181
HAIR DETAIL
LAYERS Step 10: Hair detail
Hair Detail • Zoom (Z) up close to the croquis and garment
Garment 1 photograph and look to see if you need to adjust
Figure anything to hide imperfections or things that do
not match
3 Layers
• When drawing the female croquis the neck is
LAYERS made slimmer and longer. Because of this, the
garment will sit away from the neck as in our
Hair Detail example
Garment 1
Figure • Select the layer with the garment photograph and
then create a new layer ( ), the new layer will
3 Layers always be created above the selected layer
• Name the layer ‘Hair Detail’
• Draw in a wisp of hair to cover the jacket collar
that does not meet the side of the neck
• We have used a contrast stroke and no fill
( ) to be able to see the area we want to cover
underneath
• Once you are happy with the shape fill it. Select
the shape, click onto the Eyedropper (I) and copy
the fill and stroke of the rest of the hair
• The figure and garments are complete, Save (Ctrl
C/Cmd C) this file
182
TECHNICAL DRAWING – PATTERN FILL, PATTERN BRUSH
Black and White Garments with Improvised Fabric
Pattern Fills:
Use the croquis on page 102 as a template to draw the
styles
Save as: Technical Drawing
Jacket:
There are no features in the jacket that have not been
covered in previous chapters. A list of operations
featured in the jacket are as follows:
1. The Pen Tool was used to create the jacket. The
right half was drawn first including the sleeve,
stitch details (1 Needle top stitch brush) and half
the collar, and then it was reflected to create the
left half. The buttons on the rightside opening were
changed to buttonholes
2. Create the back using the front as a guide
Remember to always create closed shapes even when
you are working in black and white, you may want to
fill the garment later. Working with the grid on will
make you more aware.
3. The back view has a Gradient Fill to give the
illusion of depth
Shirt:
The shirt has pin-tucks, satin cuffs and buttonstand
and the fabric is a shadow stripe
1. The satin cuffs and buttonstand were achieved
using a Gradient Fill
2. The pin-tucks are a pattern brush created with a
dashed line and a solid line. You can use the 2
needle top stitch instructions, making the bottom
line 2mm. Remember to create the mirror image
brush (ref page 115, two-colour brush, this is the
same principle). There is no need for corner tiles
• Place the first pin-tuck next to the buttonstand and
the last pin-tuck at the edge of the yoke
• Use the Blend Tool (W) to create the four middle
pin-tucks (ref page 58, Blend Tool, Specified steps)
• Reflect and copy the tucks to the opposite side
• Mask the tucks with the yoke, select the edge of
the yoke with the Group Selection Tool and put a
white fill and black stroke into it ( )
3. The shadow stripe is a simple vertical stripe pattern
repeat. The stripe pattern repeat in the sleeves is
rotated using the Tilda key (ref page 72)
183
TECHNICAL DRAWING – PATTERNED FABRIC FILL
Skirt:
• The pattern repeat in the skirt was achieved by
using downloadable free fonts from the Internet
• The paisley pattern is a font (search term ‘Paisley’
ref page 151, downloading fonts)
• Type out the whole alphabet and select the Paisley
font from the Font library and Create Outlines (ref
page 147)
• Ungroup the designs and select the designs you
wish to use, Delete the rest
• Create a 20mm square rectangle to create the
repeat, you can base this on the same principles as
the spot flower repeat on page 119
• Even though there are now three motifs the same
principles still apply
• We have drawn up the repeat illustrating the motifs
that go beyond the boundary of the repeat in the
same colour
• Note the four blue corner motifs, each of these is
a quarter of the full motif, the two red motifs are a
half of the full motif and the green and orange are
also a half
• Remember the transparent boundary box at the
back of the print contains the repeat (ref page 77 for
troubleshooting)
• Fill the skirt with the pattern repeat and scale the
design to suit the size of the sketch (ref page 72)
• This style has a contrast front basque panel. This
has been achieved by scaling the pattern repeat up
to about 200%
184
TECHNICAL DRAWING – DROP SHADOW
Drop Shadows:
• Once all three styles have been drawn up you can
create a drop shadow
• Group each garment individually, this should
always be done
• Go to Effect in the menu bar
Stylize Drop Shadow
• A dialogue box will appear
• Select the options you want and select Preview to
see the effect
• Mode: This works the same way as in the
Transparency panel
• Opacity: The depth of the colour
• X Offset: This is the horizontal offset, i.e., how far
up or down the shadow is placed
• Y Offset: This is the vertical offset, i.e., how far
left or right the shadow is placed
In this example the shadow will fall to the right and
down; if a subtraction symbol had been placed next to
both the numbers the shadow would have fallen to the
left and up.
• Blur: This controls the blurring on the edge of the
shadow
• Color: The colour of the shadow can be changed
by double-clicking onto the colour option box and a
colour picker will appear
• The technical drawings are complete, Save (Ctrl
C/Cmd C) this file
185
DIGITAL PHOTOGRAPH EDITING
Digital Photograph: Edited to greyscale and masked
• Open the file containing your digital photographs
JPEG or TIFF. The image may be much larger than
the A4 page and also a high-resolution image, this
is not necessary for this exercise. To reduce the
resolution of the photograph which will reduce the
file size you can Export the file to a JPEG file.
Check that the File Type is JPEG and Export it
with the following properties CMYK, Custom
150 dpi and save it as a new name: Story Board 5
Fashion Illustration and Technical Drawing, so
as not to confuse the two files. Close the original
file and open up the new file. Save it again as an
Illustrator file: Story Board 5 Fashion Illustration
and Technical Drawing.ai
This is the main file for Story board 5.
• Before you start change the Artboard size on this
page to A4 Portrait (ref page 33)
• Select the photograph which is a bitmap image to
convert it into an editable vector image
• Click onto the arrow next to Live Trace in the
Control panel and select Grayscale
• Once the image is traced, an option to Expand the
image will appear in the Control panel
• Click onto this option and the image will become a
vector image
• Deselect the image
• Scale the image to fit the page considering planned
layout
• If necessary mask the area needed. Marquee over
the area of the image you would like to mask with
the Rectangle (M) tool.
• Select both the image and the rectangle and, right
click the mouse Make Clipping Mask (Ctrl 7/
Cmd 7)
• The background image is complete, Save (Ctrl C/
Cmd C) this file
186
The words you are searching are inside this book. To get more targeted content, please make full-text search by clicking here.
Fashion Designer's Handbook for Adobe Illustrator
Discover the best professional documents and content resources in AnyFlip Document Base.
Search