Total time: GRUNGE
3-5 hours CREATIVE DECONSTRUCTION
Difficulty Level: Normal The word ‘Grunge” originated in the early 1990s within the PHOTZY.COM
music industry. It started in the Seattle, Washington area with
Skill Points:
• Recognizing what Grunge the advent of ‘Punk Bands”. The genre is often described as dark, old, and
Photography is as a genre portraying peculiar vibes. It’s meant to shake-up a viewer’s senses.
• Creating Grunge images
KEY LESSON: Grunge photography, also known as ‘Lo-fi’, often requires
either in-camera or using the use of old or toy lenses. Toy cameras, film and digital, are also a
editing apps favorite. While there is an emphasis on using film for Grunge
Photography- you can mimic most of the effects easily using editing apps.
EQUIPMENT: Any camera (One Action Assignment requires a film camera) | Any lens | Specialized Editing App
SAMPLE PHOTOGRAPHS Using Film
Left: This is a classic example of Grunge Photography created
12 using film and a toy camera. Notice the vignette, the pincushion
perspective, and the obvious out of focus areas. The technique
often exudes high contrast and unusual color shifts.
Right: Another technique includes using film with the wrong
color balance for the lighting, cross-processing the film, and
then scratching it with various utensils.
34 Using apps
56 Left: With app software you can take a normal photograph
and turn it into a piece of grunge beauty. This is known as
‘Deconstruction’. This means taking a normal image file and
applying grunge effects using post-processing software.
Right: This image was deconstructed using the app Snapseed. It
is one of the most versatile apps on the market, and it’s free.
Make it interesting
Grunge photography, or alternative forms of photography,
are a great resource when you have limited access to a photo
opportunity. Perhaps the weather is bad, or you simply have dull
lighting on the one day you can take pictures. These techniques
can put some pizazz back into a shot that is well composed, but
lacking visual punch.
ACTION ASSIGNMENT!
1- Download the free Snapseed app onto your smartphone or tablet
2- Spend an afternoon out shooting pictures. Keep in mind that you are going to deconstruct them into Grunge
Photography. Look for subjects that fit to the genre, or perhaps need help due to poor lighting.
3- If you have a film camera. Shoot a roll of film using the wrong color balance of light. Process your film
uncut. Scratch the film with pins, scissors, and various kitchen knives. Study the entire roll for interesting
compositions. Don’t be afraid to include parts of two different frames. Scan at least four shots from your
roll. Post-process them further to your liking.
4- Print out all of your photos and share them with others.
HOW DID YOU DO?
• Did you find subjects that fit well into the Grunge Photography theme?
• What type of feedback did you get from others that saw the photos?
READY! SET! GO! ACTION CARDS - STRETCH GOALS: GRUNGE
Total time: FIBONACCI &
2 - 3 hours THE GOLDEN SPIRAL
PHOTZY.COM
Difficulty Level:
Very challenging This Action Card is meant to give you an introduction into this
Skill Points: very complex subject. In 1200 A.D. a Mathematician named Leonardo Fibonacci
• Learning what the Fibonacci
Sequence is discovered a sequence of numbers, which is now known as, The Fibonacci
• Discovering how it created
the Golden Spiral Sequence. This sequence of numbers led to what is known as “The Golden
• Using the Golden Spiral to
judge your composition skills Ratio”, which is 1.618 to 1. As Fibonacci further explored his numbers, he
EQUIPMENT: developed a formula known as “The Golden Ratio”, which further evolved into
- Any camera including mobile
- Any lens “The Golden Spiral”. We will be concentrating on the Golden Spiral.
- Editing software with
KEY LESSON: The reason that Fibonacci’s sequence is known as The
layering capability Golden Ratio is because it is found literally everywhere in the Universe.
The Golden Spiral is found everything from art to architecture and in
nature. We have included a Golden Spiral overlay that you can copy and
paste into your own images to see how they fit into the spiral.
- Watch the Bonus video showing you how to do this. -
SAMPLE PHOTOGRAPHS
Golden Spiral: Fibonacci’s sequence of numbers led to the Golden
Ratio, which further developed into the Golden Spiral. The Golden
Spiral has proven itself to be one of the most, if not the most,
pleasing composition pattern to the human mind.
When you begin to look around, you will see the Golden Spiral
is evident in everything around you: from products, to logos, to
architecture, and even in nature. Some of the earliest artists in
mankind’s history began employing the Golden Spiral.
12
1- The Golden Spiral is found everywhere in nature. 2- Use the included Golden Spiral .png file, and a
You may have heard this mathematical equation layering program, to check your own photography.
referred to under different names such as the By copying the .png file, and pasting it into a new
Golden Mean, Phi, The Divine Proportion, or even layer over the photo, we can see how we need to
the Rule of Thirds. The Rule of Thirds was originally crop the image to “fit” the Golden Spiral.
devised as a result of Fibonacci’s Sequence.
ACTION ASSIGNMENT!
1- Watch the Golden Spiral Bonus Video and download the .png file onto your computer
2- Using a layer-based program place the Golden Spiral onto your images and judge your composition.
HOW DID YOU DO?
• Were you composing to the Golden Spiral ratio?
• If not, were you able to use the .png file as a guide to crop into a better composition?
READY! SET! GO! ACTION CARDS - STRETCH GOALS: FIBONACCI
Total time: MIXED MEDIA PHOTZY.COM
4-6 hours
CREATING ALTERNATIVE ART
Difficulty Level: Challenging
Mixed Media is an art discipline that seeks to unify a range of
Skill Points: art forms. This is achieved by creatively combining an array of
• Learning how mixed artistic insights and crafts towards the photographic medium.
media works
• Creating mixed media ideas KEY LESSON: For this Action Card, we will concentrate on three mixed
• Creating mixed media media ideas. Please use this as a springboard toward creating your
images own ideas. Accomplishing these Action Assignments should help you to
visualize your photographic art… beyond simply taking a picture.
EQUIPMENT: Any camera including mobile | Any lens | Printer for Action Assignment (you will need to create a print)
SAMPLE PHOTOGRAPHS
1 23
1- This is a very clever use of mixed media. It combines photography with paper cutting. Think about all of the
different shapes that you could cut into a piece of paper or cardboard! What type of background would you
place behind your cutout to create artistic meaning or drama?
2- Using paint, to create unrealistic colors, turns a simple pineapple into a work of Minimalist art. What other
ways could you use paint and photography?
3- This example photograph takes “mixed media” to the next level. In the original photograph, the model was
“painted”. In post-production, the photographer turned 1/3 of the image into a monochrome representation.
They then took mixed media to the next level by including a paintbrush dipped in black paint. Try this:
photography, paint, and “fill-in the blank”.
4- This is an easy way to get started with
mixed media. Create a photograph. Print
that photograph. Use that photograph
as part of a new photograph. In this
example, it alters the subject.
5- This photo is similar in technique to the
previous example, except instead of
4 5 altering the subject - the print “becomes”
the subject. The “second photograph”
is merely providing an interesting and
meaningful background.
ACTION ASSIGNMENT!
1- Create a photograph where you mix paint and photography to craft the final result.
2- Create three photographs, where you fashion cutout shapes on white, or colored, art board, and then use
them to make a visual statement against a background. Don’t go for the easy answer. Think through the
process, and make the combination meaningful.
3- Take a photograph that already exists in your files. Print it. Place it in a scene, and photograph it. Use this to
test your creativity. Your final image should alter a viewer’s perception of the original shot that you printed.
HOW DID YOU DO?
• Of the 3 Action Assignments, which one was the most successful for you?
• What three shapes did you use for your cutouts and why? Do others understand your intended meaning?
READY! SET! GO! ACTION CARDS - STRETCH GOALS: MIXED MEDIA
Total time: CAPTURING THE PHOTZY.COM
4-8 hours
MILKY WAY
Difficulty Level:
Challenging To photograph the Milky Way, it’s going to take some
specialized skills, equipment, research, and patience.
Skill Points: While that may seem daunting at first, the rewards are worth it.
• Photographing celestial KEY LESSON: To successfully capture a Milky Way photograph,
bodies (outside of equipment), you need the following- A location that is free
• Working with apps and of light pollution, a clear night, a proper time of the year, and the
software knowledge of where and when the Milky Way will appear in the sky.
• Using long exposures There are several apps to help you. PhotoPills, or Skyview, will help
properly you find the Milky Way in the Sky. Dark Sky Finder, or the website
• Composing at night Light Pollution Atlas, helps you to find a location with minimal light
pollution. The Dark Skies app will help you to eliminate star trails by
calculating the maximum shutter speed length for your lens.
EQUIPMENT: Camera with “Bulb” setting | Sturdy Tripod & Remote Shutter Release | Wide-angle Lens 14-24mm range
10 lb. Sandbag (optional to add weight to the tripod if it’s too windy) | Post-processing software | Recommended Apps
SAMPLE PHOTOGRAPHS
1 234
1- Light pollution can 2- Start with a simple 3- Light pollution can 4- An unprocessed Milky
ruin your shot. You will silhouette of a structure
be photographing at in the foreground to add also be beneficial if Way picture will lack
extended exposures. composition. If nothing
is available then start it’s properly placed. color and contrast.
by just including the
sky. Eliminate star trails Your exposure times Post-processing is a
based upon lens focal
length calculations. will range from 20 – 50 necessity.
seconds. Be aware of
objects in motion that
might ruin your shot.
ACTION ASSIGNMENT!
1- Research a location with little or no light pollution, pick a clear night, and choose an app to help you locate
the Milky Way in the sky.
2- Set up your equipment. Set your lens aperture to the widest setting, and the ISO to 3200 (go to 6400 if your
initial attempt is too dark). Set the shutter speed, as determined by the “600 rule” or use the “Dark Skies” app.
3- Include a foreground object in silhouette, (if possible), otherwise frame for just the Milky Way in the sky.
4- Use camera “Live View” - Zoom in on a star and manually focus the lens. The star should appear as a solid
point with no halo. Zoom out to recompose.
5- Unprocessed Milky Way photos are dull in color and contrast. Post-processing is a necessity. Shoot in
camera raw. Use the Clarity, Saturation, Vibrance, and Contrast settings to make the Milky Way Pop!
HOW DID YOU DO? • Did your post-processing make the Milky Way pop and increase color?
• Did you capture an accurate exposure?
• Is your shot free of star trails?
• Is the Milky Way in focus?
READY! SET! GO! ACTION CARDS - STRETCH GOALS: MILKY WAY
Total time: MOOD BOARDS
4-6 hours
GETTING THE MESSAGE ACROSS
Difficulty Level: Challenging
Mood boards are visual collages of inspirational photos, or PHOTZY.COM
Skill Points: other related materials, designed to provide yourself, your
• Using the Mood Board tool
• Learning to create a team, or a client with a visual reference guide that everyone can agree on
mood board
• Completing a photo shoot before your photo shoot begins.
using a Mood Board as guide KEY LESSON: A mood board can be a pivotal instrument in the creative
process for photography. Often used for fashion, portraiture, wedding,
and food photography- it can be extremely helpful for any genre,
especially if you are just learning the art of photography.
EQUIPMENT: Any camera including mobile | Any lens
SAMPLE PHOTOGRAPHS
The Mood Board is a tool that can help you get close enough to If you were to book a portrait session,
a specific concept, or idea, without actually copying the work of and the customer wanted something
someone else. Your photos can have a similar feel to the Mood similar to these examples, however, you
Board examples, but creative differences will be apparent in the provide shots like the previous three
final photographs. They also work extremely well for team produced examples on the left. Things will not
projects. For example, in a fashion shot, (such as this example), you likely end well. A mood board helps
may have a team member finding the clothing, another doing the alleviate this potential problem by
hair and make-up, and yet another searching for locations and props. establishing boundaries and guidelines.
Creating mood boards will also inspire you to
try things that you might not have thought of
on your own: including dramatic angles (see
the Dramatic Angles Action Card), and the
use of bold color (see the Color Saturation
Action Card). Creating mood boards is an
excellent exercise for your creative muscle.
ACTION ASSIGNMENT!
1- Organize a photo shoot similar in content to the example photos (a fashion portrait). Try to have at least two
models- one male and one female.
• Create mood boards that illustrate your ideas on the fashion portraits for each subject.
• If you have a team- distribute your mood boards and set them to action.
• If you are on your own, begin to produce your shoot using the mood board as guide to location, clothing,
props, hair, jewelry, and anything else that comes to mind.
2- Print the final photographs using your home printer. Examine them together with your mood boards.
HOW DID YOU DO?
• Do your finished photographs reflect your mood boards? If not, why?
• If you used a team, did they find the mood board helpful? Did it assist in your expectations?
READY! SET! GO! ACTION CARDS - STRETCH GOALS: MOOD BOARDS
Total time: COMPOSITING IMAGES
4-6 hours
TO REACH NEW LEVELS OF CREATIVITY
Difficulty Level: Challenging
Compositing is the combining of visual elements from separate PHOTZY.COM
Skill Points:
sources into a single photograph. The idea behind the final photo may be to
• Learning how
compositing works create something realistic or something more fantasy oriented.
• Discovering inexpensive
alternatives to full pro- KEY LESSON: Compositing used to be difficult since it used to require
grams like Photoshop expensive layering programs like Photoshop. Now, you can composite
• Creating some composite images using phone-editing apps, which is a great way to get started - if
images you don’t want to spend a lot of money on a full-featured editing suite.
Our favorite phone editing apps for compositing are: Photoshop Mix
(requires free Cloud account), Snapseed, Photoblend Pro, Enlight, Blend
Editor, and Fused. They are either free or only cost a few dollars.
EQUIPMENT: Any camera including mobile | Any lens | Software: This requires a layer-based program such as
Photoshop (Lightroom will not work), or an appropriate smart phone app.
SAMPLE PHOTOGRAPHS Waterscapes: Here are two photographs that can be combined, through compositing, to create a stronger
single image. If you’re completely new to compositing, start with a simple app. For a beginner, we recommend
Fused. Try each app since all have one or two composite techniques that they are really good at.
Red Light & Snow: With compositing, you can do
what’s called overlay imaging: where you “blend”
parts of each image together. Many apps refer to
compositing as blending. Here, the original was
blended with a texture layer, and a semi-
transparent teal colored layer, to create a final
image that was far more interesting.
Window: When you begin compositing, you will start
seeing objects, and scenes, as pieces to a puzzle
rather than finished photos!
There are two key factors to compositing: layers and
masks. If your image file was created with a different
camera, such as a DSLR, simply transfer the file to
your app for editing (it may require a .jpeg file). Make
sure that all of the resolution settings are set to the
highest resolution: both for importing & exporting.
ACTION ASSIGNMENT!
1- For the purposes of this Action Assignment, we want you to use an app. Compositing in Photoshop requires
a far deeper explanation (See Photzy.com for the Masking Guide). We encourage you to use the app “Fused”
(easiest), Photoshop Mix (easier with full features), or Blend Editor (numerous creative options).
2- Pick two photographs to composite. One photograph should be simple and without a lot of detail. The other
photograph should be a headshot of a friend or family member against a black background.
3- Blend the two shots using your apps. Try all the different settings to get familiar with them.
HOW DID YOU DO?
• Do you now have a basic understanding of what compositing is and how it works? Which app worked best?
• Are your composited photos visually stronger, and more interesting, than either of the individual photos used?
READY! SET! GO! ACTION CARDS - STRETCH GOALS: COMPOSITING
Total time: STORYTELLING
4-6 hours
WITH PHOTOGRAPHY
Difficulty Level: Challenging
Storytelling is an art form. For some people, it comes naturally. PHOTZY.COM
Skill Points: For everyone else, the good news is… that it’s a skill that can
• Learning how to identify be learned, especially as it relates to photography. A good storytelling
photograph will always include some element of drama.
storytelling elements
• Discovering how to work a KEY LESSON: The key to successful storytelling photography is to be
aware of drama and to look for it. Find the drama in what it is you’re
scene and find the story seeing. The art of storytelling is as old as mankind. If you would like
• Developing the skills to to dig deeper into this subject, check out Photzy’s Premium Guide,
“Effective Storytelling with Photography”.
incorporate storytelling
into your photography
EQUIPMENT: Any camera including mobile | Any lens
SAMPLE PHOTOGRAPHS
1 2 345
1- Storytelling requires drama. Drama elicits a reaction. One way to convey a visual story is through
comparisons. The drama of the tiny hand juxtaposed against the larger hand elicits an emotional response.
Does it hurt the story that we don’t know the relationship between the hands? No. In fact, really good stories
often leave some mystery. This allows us, as viewers, to fill in the details in our mind.
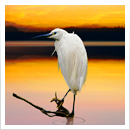
2- A location such as this landscape is ripe with photo opportunity. However, it’s the inclusion of the heron that
brings a story element to this shot. Train yourself to look for the less obvious details that will create
dramatic effect.
3- A simple photo tells a better story. If a viewer has to spend time trying to “figure out” the story, they probably
aren’t going to “get it”. This shot borders on being “too complicated” in its story.
4- A story will often develop quickly, and you must be ready. This shot without the driver is meaningless.
Including the driver creates the necessary drama to make the shot successful. You will often spot a scene
that you want to photograph, wait for a story to develop. Patience often pays off.
5- A great story often involves action. Activity always has the potential for creating drama. Watch the activity
surrounding the subject. Wait for something to develop.
ACTION ASSIGNMENT!
1- Choose a family member, or friend, who has a child. Photograph them and create storytelling photos.
Some photos can be obvious in the story. However, try to make some of them less obvious (think of the
hands example photo).
2- Go to a public venue. For example, go to the zoo, a carnival or fair, an outdoor concert, an outdoor art fair, or
a large well occupied park. Stake out an area as your location. It doesn’t have to be a single spot, but a
general location. Don’t wander the entire area. Have your camera ready, watch, and photograph drama that
unfolds. Try to create at least 10 successful storytelling shots.
HOW DID YOU DO?
• How many shots did you take at your chosen venue? How many did feel successfully conveyed a story?
Print out those shots and share them with family or friends. Ask them, what they think the story is.
READY! SET! GO! ACTION CARDS - STRETCH GOALS: STORYTELLING
Total time: THIS ACTION CARD IS ESSENTIAL:
1-2 hours
RECIPROCAL RULE
Difficulty Level: Very easy New photographers are often frustrated, because their images PHOTZY.COM
are not sharp. The biggest “Photo Killer” in this regard is called camera shake.
Skill Points: Camera shake occurs when the shutter release button is depressed to create a
• Discovering proper form photograph. The camera literally shakes, and creates motion blur in the image.
in holding a camera KEY LESSON: As the focal length of a lens is increased, so is the
• Using the Reciprocal Rule magnification. As the magnification increases, so is the possibility of
camera shake. There are really two key lessons in preventing this. The
to increase image sharpness first one is proper form and technique when holding the camera. The
second one is the “Reciprocal Rule”.
EQUIPMENT:
- DSLR, mirrorless, or hybrid
camera and different lenses
START HERE
Lenses: The camera lens plays a critical role in the occurrence of camera shake. A lens that is physically large
is more prone to camera shake. The Reciprocal Rule states, that the shutter speed of your camera should be
at least the reciprocal of the effective focal length of the lens. (Ex. 50mm use 1/50th)
Proper Grip: However, just using the Reciprocal Rule may not be enough. Holding the camera properly, and
then using a smooth movement when depressing the shutter release button, also impacts camera shake.
Good form: When handholding a camera, use the viewfinder and not the Live View function. Press the
viewfinder to your face. Support the lens from beneath. Tuck your elbows into your side or chest. Breath evenly.
Slowly depress the shutter release. Use the Reciprocal Rule.
1 300mm 2 85mm 3 28mm
SAMPLE
PHOTOGRAPHS
1- Telephoto: If this photograph were shot hand-held with a 300mm lens, what does the Reciprocal Rule tell us?
The shutter speed should be 1/300th of a second or faster.
2- In the middle: While the Reciprocal Rule gives you a guideline, your camera holding technique plays a huge
role. With an 85mm lens the shutter speed should be 1/85th of a second or faster. If your camera technique is
still being developed, your shutter speed should likely be faster. If your camera technique is excellent, you
may get away with a slower shutter speed than 1/85th of a second.
3- Wide Angle: These lenses do not magnify a scene, they push the scene out and away. This allows them to be
handheld at slower shutter speeds. You would likely never want to handhold your camera at a shutter speed
of 1/8th of second or slower.
ACTION ASSIGNMENT!
1- Organize a photo shoot, and use all of your lenses- use every focal length. If your lenses are zoom lenses,
then shoot at various zoom focal lengths.
• For each scene and focal length- shoot your first image using the Reciprocal Rule.
• After the first shot, for each scene and focal length, vary the shutter speed both up and down.
• Take notes- or make sure that your camera data is being recorded.
• Have a friend shoot video of you taking the pictures. Examine the video for flaws in your camera holding
technique. Print your images.
HOW DID YOU DO?
• Did you create a sharp image at the setting recommended by the Reciprocal Rule? If not, you need to work on
your camera technique.
READY! SET! GO! ACTION CARDS
STRETCH GOALS: RECIPROCAL RULE
Total time: SELECTIVE COLOR
4-6 hours
HOW TO USE IT PROFESSIONALLY
Difficulty Level: Very easy
Selective color is a feature in some digital cameras or it is a PHOTZY.COM
Skill Points:
• Using Selective Color to post-production technique. Selective color is NOT spot color.
improve a composition (See the Spot Color Action Card.) Selective color combines monochrome tones,
• Learning the difference
along with colored hues, in different portions of the same image.
between Selective Color
and Spot Color KEY LESSON: Some cameras allow you to use a “Selective Color”
• Shooting and completing a setting. We do not recommend this, as it takes the creativity and fun out
Selective Color portrait of the process, and limits your end result. If you have no other option,
session then by all means go for it. The single biggest lesson here is selecting
the right subject for the technique.
EQUIPMENT: Any camera including mobile | Any lens | Photo Editing Software
SAMPLE PHOTOGRAPHS
Wrong and Better
1- This is a very amateur looking attempt at selective
color. All of the monochrome areas in this image have
disappeared, and they don’t provide value to the image.
2- This is a better example. The selective color was used
to enhance the features of the model and props that 1 2
the photographer wanted you to take direct notice.
345
The photographer had an interesting idea of combining the model and the graffiti. It’s clever. However, the
model is lost in the busyness. This is perfect for the selective color technique.
3- Select the model using any of the myriads of selection tools available today in virtually any software
package- even mobile.
4- Reverse the selection, isolating the model from the background. Make sure that your edges of the selection
are clean, so that there is no bleed from one section to the other. This is known as leaving artifacts.
5- Convert the background to a monochrome black & white. If you’re unsure on B&W conversion- Photzy offers
an in-depth Premium Guide on that subject titled: Better Black & White. The model now stands out from her
background. However, the theme and the idea behind the shot are not only visible, but also enhanced.
ACTION ASSIGNMENT!
1- Organize a photo shoot similar in content to the example photo (model & moto).
• Place your model in front of busy backgrounds. Make sure that the background is pertinent
to the story you are trying to tell about your model (as in the example)
• Create a number of different shots, in different locations, as some will likely work better than others when
you get into post-production.
• Edit your photos into selective color following the guidelines above. If you’re unsure on how to make a
selection- there are many free tutorials- or you can check out the Photzy publication, “The Next Step To
Perfect Photography: Understanding Masking In Post-Production”.
HOW DID YOU DO?
• Do your finished photographs reflect a professional use of selective color?
• Were you able to make a clean selection of your subject without leaving artifacts?
READY! SET! GO! ACTION CARDS - STRETCH GOALS: SELECTIVE COLOR
Total time: GOING TO AN EXTRA LEVEL
9-12 hours
PRE-VISUALIZATION
Difficulty Level:
Very challenging Pre-visualization began in Hollywood with moviemaking and PHOTZY.COM
Skill Points: the art of storyboarding. Photographer Ansel Adams is credited
• Learning what
with bringing the idea to still photography. Pre-visualization is the art of seeing
pre-visualization is
• Discovering how to break the finished photograph, in your mind, before you ever pick up a camera. It
down a scene for pre- may sound easy, but it requires advanced skills in art knowledge, equipment,
visualization
• Create photographs and composition, lighting, exposure, and post-processing.
following through with the
pre-visualized ideas KEY LESSON: The goal of this Action Card is to make you aware of the
idea of pre-visualization, and to begin practicing it. This is not something
you will learn quickly. In fact, it’s a lifetime endeavor. However, the more
you practice, the better you will become with this highly specialized skill.
EQUIPMENT: Any camera including mobile | Any lens | Photo Editing Software
SAMPLE PHOTOGRAPHS
1 23 4
1- For a moment, change the word pre-visualization to translation. Try to complete a mental translation of a
3-dimensional scene into a 2-dimensional photograph. This photo is a perfect example. It was taken in Las
Vegas from a 12th floor hotel room. It depicts a cityscape that is semi-obscured by a window shade. What you
see here is exactly what the photographer saw in his mind before clicking the shutter. When attempting this,
imagine your scene printed huge, framed, and hanging on a large blank wall.
2- A first step toward pre-visualization is training to see in spatial relationships versus actual objects. A spatial
relationship, in art, is the ability to perceive the relationship of an object’s position within a space. In this
photo, the photographer saw the pre-visualized shape of a man, in a dark suit, within the surrounding white
space of the buildings.
3- Spatial relationship is intrinsically tied to light, shadow, color, and shape. A fantastic training tool for
developing pre-visualization is to view your scene through squinted eyes. This eliminates details and divides
the scene into spatial blocks of light, dark, color, and shape.
4- Understanding your equipment is key to pre-visualization. If you don’t know how your equipment if going
to affect the photograph, how can you pre-visualize it? The photographer saw an almost semi-abstract image
with blocks of color and little depth. Knowing this- he selected a telephoto lens to compress the scene.
ACTION ASSIGNMENT!
1- Organize a photo shoot where you will spend the better part of a day out taking pictures.
2- Do not take a picture before you spend at least 5 minutes thinking about the picture and anticipating what
it would look like hanging on your wall. Set a timer.
3- Post-process to your pre-visualized thoughts.
4- Print a selection of your best efforts. Tape them to a blank wall in your home. Leave them there for a week.
Each day, stand 5 feet (1.5 meters) in front of each photo and look at it for 1 minute or longer.
HOW DID YOU DO?
• Do your finished photographs reflect your initial pre-visualized intent?
• Were you able to follow through on your pre-visualization from beginning to end?
READY! SET! GO! ACTION CARDS
STRETCH GOALS: PRE-VISUALIZATION
Total time: PASTEL COLOR
3-5 hours THE UN-SATURATED LOOK
Difficulty Level: Normal A pastel color is defined as a soft and delicate shade of color. PHOTZY.COM
Pastel colors are not intense in saturation, luminance, or
Skill Points:
• Understanding pastel colors brightness. They create a clean and subtle look. Pastel colors are not pure
• Discovering how to use
pastel colors in a photo colors (see the Color Saturation Action Card).
• Learning how to post-
processing for the KEY LESSON: A ‘pastel look’ can be achieved in post-production by
‘Pastel Color Effect’ brightening the image, lowering the saturation level, slightly decreasing
the contrast, raising the black point, and finally applying a split tone
filter. You can also stage a shot that begins with pastel colors.
EQUIPMENT: Any camera including mobile | Any lens
SAMPLE PHOTOGRAPHS
1 23 45
1- Simply increasing image exposure, or image shot. In PP for the pastel look, the 1st step is to
brightness, does not create a pastel color scheme. brighten the image approx. +20%.
The lighthouse photo, although tagged as being a The second step is to lower contrast approx. -10%.
pastel color photo, is really just overexposed. The third step is to increase the black point by approx.
2- This example photo was staged with pastel colors. +20%.
Using the post-processing technique, (described The 4th step is to reduce Clarity by approx. -5%,
below and in the Bonus video), can add to the Vibrance -15%, and Saturation -25%.
Pastel Color Effect. Some color photos, will not The 5th step is to raise the Black Point approx. +5%.
post-process into the pastel color scheme very well. The final step is to apply a split-tone, which will vary
It helps to start with pastel colors to begin with. depending on the original image. (See the ‘Creating a
3- This example photo has similar color values to the Pastel Color Effect’ Bonus Video.)
Lighthouse example, however, this image is 5- Not all subjects will lend themselves to the
properly exposed, and it has a pastel color scheme. Pastel Color Effect. Part of the learning process is
4- In a properly adjusted pastel color scheme- there discovering what works, and what doesn’t!
is generally no deep black value, such as in this
ACTION ASSIGNMENT!
1- Go on a photo shoot for an afternoon where you will look for, or create, scenes that already have pastel
colors in them, and also those that don’t. The subject matter is open.
2- You should end up with about 4 to 6 final image files to work with.
3- Using your editing software go through the Pastel Color Effect post-processing steps with each shot.
(Refer to the bonus video.)
4- Print out your finished images- along with the original images files, and study them as a group.
HOW DID YOU DO?
• Do you now understand how the Pastel Color Effect works?
• Do you now feel more confident judging what subject matter fits the Pastel Color Effect?
READY! SET! GO! ACTION CARDS - STRETCH GOALS: PASTEL COLOR
Total time: THE LITHO FILM EFFECT
6-8 hours
TO REACH NEW LEVELS OF CREATIVITY
Difficulty Level:
Challenging Back when film was more popular, there was a creative option PHOTZY.COM
called “Litho Film”. Litho is a black and white orthochromatic film with one
Skill Points: very distinct characteristic: when processed with a particular developing agent,
it only reproduces black tones and white tones. There are no middle tones.
• Learning about the Litho The resulting images can have a striking graphic effect.
Film Effect
• Discovering how to create it KEY LESSON: We can digitally recreate the Litho Film effect. If you have
in post-production Photoshop this is quite easy. Open your photo, navigate to the Image
• Developing the skills to drop-down menu, select Adjustments, and select Threshold. If you do
evaluate a subject for the not have Photoshop, you can still recreate the effect in other programs.
Litho Film Effect It just takes a bit more work. Images that already have high contrast,
and strong dominant shapes, lend themselves well to this technique.
EQUIPMENT: Any camera including mobile | Any lens | Post-processing Software
SAMPLE PHOTOGRAPHS
12 3 4
1- This example 2- The Threshold 3- Use any editing software you 4- If you’re out shooting,
shows you how the Adjustment, within have. Set the color saturation and you don’t have the
Litho Film Effect can Photoshop, quickly and setting to zero. Set the contrast best light, the Litho Film
bring some visual easily reproduces a true adjustment to maximum Effect can save the day.
interest to a mundane Litho Film Effect. By contrast. Adjust the brightness Interested in Abstract
shot. Depending on moving the Threshold level up and down – stop when photography? See the
your process, you Level slider, the it looks close to your desired Abstract Action Card, this
may not be able to software determines outcome. Adjust the black and technique lends itself well
eliminate ALL of the how much of the white points using levels (or an to this genre.
middle tones. original image file will equivalent). It now becomes a Don’t be afraid to go crazy
be converted to black… game of modifying these settings with creativity.
or white. until you achieve a desired look!
ACTION ASSIGNMENT!
1- Organize a photo shoot where you will go in search of subject matter that you believe will make interesting
Litho Film Effect photos. Create at least 10 different photos with 10 different subjects. (Developing an eye
for this technique takes time.)
2- Organize a portrait session with a friend or family member. Contrary to normal thinking- use the harshest
most highly contrast producing light source that you can. Study the contours of their face and body as you
light them. Remember, you will have black tones, and white tones, with little or no tone between. So, shape
is important. (Study the woman portrait above). Shoot at least 10 different portraits while changing the
lighting and the angle.
3- Go into your post-processing session and create a Litho Film Effect with all 20 images. Use whatever
method you have, or even try different methods.
HOW DID YOU DO?
• Did all of your chosen subjects in Action Assignment #1 work out well in the Litho Film Effect? Or, did you
discover how some subjects work better than others?
READY! SET! GO! ACTION CARDS
STRETCH GOALS: LITHO FILM EFFECT
Total time: THE 500 RULE
3-6 hours
IS FOR THE STARS | ASTRO-PHOTOGRAPHY
Difficulty Level:
Very challenging If you’ve ever dreamed of creating beautiful Milky Way pictures, PHOTZY.COM
or landscape images combined with a sky full of shimmering stars, then this
Skill Points: Action Assignment is for you. The 500 Rule is about keeping the stars sharp!
• Creating astrophotography
KEY LESSON: This rule states what the maximum time of shutter
images without star trails speed, with stars, can be that will NOT result in star streaks. You divide
• Learning how to calculate the effective focal length of the lens into the number 500. So, a 50mm
the length of shutter speed lens, on a 35mm camera, or a full frame digital camera, would be 500 /
needed for star trails 50 = 10 seconds of exposure before star trails become noticeable. For
• Applying the 500 Rule sensor formats other than full frame (35mm film), a further calculation is
during a photo shoot required (see example photos below).
EQUIPMENT: Any camera with manual exposure | wide-angle to normal lens | Tripod
Remote Shutter Release - recommended | Post-processing software
SAMPLE PHOTOGRAPHS
1 2 345
1- Due to the rotation of the Earth, the stars record as streaks of light “through the sky” in long night time
exposures. Star trails can be a desired effect, but we may also want points of light (as we see the stars with our
eyes). To achieve “points of light”, you need to use the “500 Rule”.
2- You may also have heard of the 600 Rule. The 600 Rule provides slightly longer exposure times, which may
result in star trail blur. The advantage is that it allows more light to reach the sensor (or film) for exposure. We
recommend the 500 Rule.
3- When you work with a smaller sensor camera, you must include an extra calculation, which takes into account
the crop sensor factor (unless it is a DX lens designed for the smaller sensor size). Crop sensor factors for
these brands include: Sony and Nikon/1.5X & Canon 1.6X. Here is the 500 Rule formula, with the Nikon “crop
factor” included (as an example): 50mm lens x Nikon 1.5x crop factor = 75mm equivalent focal length. 500
divided by 75mm equals a 6 second maximum exposure length before star trails occur (always round down).
4- If the stars are sharp, and your picture exhibits one to several trails, this is not a failing of the 500 Rule. What
you have captured is likely an airplane contrail, or a meteor.
5- You can also leave the 500 Rule behind, and experiment with creative star trails in your shots.
ACTION ASSIGNMENT!
1- Organize a photo shoot similar in content to the example photos: Find an area with minimal light pollution.
Have a clearly definable horizon line at the base of your photograph. Apply the 500 Rule to establish
exposure length. Be sure to include the lens focal length and the crop factor (if necessary). Set your
aperture to the widest setting and the ISO to 1600. Adjust as necessary for proper exposure after a test shot.
Shoot in Camera Raw for maximum post-processing capability.
2- Shoot a number of frames starting at your calculated exposure length, and then increase and decrease the
length of time. Adjust the ISO to keep a correct exposure. Keep good notes.
3- Adjust color, contrast, clarity, and saturation in post-production. All digital astrophotography requires
post-processing to excel.
4- Print all of your different versions with your home computer printer or a photo lab.
HOW DID YOU DO?
• Did the 500 Rule correspond as the sharpest image with no star trails and the best exposure?
• Do you now see how the exposure length affects the star trails?
READY! SET! GO! ACTION CARDS - STRETCH GOALS: 500 RULE
Total time: COLOR SATURATION
2-3 hours
CREATING ALTERNATIVE ART
Difficulty Level: Challenging
Color theory is extremely complicated. This time we’ll look PHOTZY.COM
Skill Points:
• Understanding what at color saturation. Over-saturation of color photography has been popular
color saturation is
• Discovering how to in recent years. There is nothing wrong with that -when the technique fits
accurately adjust color
saturation the subject. However, you should have an understanding of the difference
• Learning what over color
saturation looks like between low saturation, accurate saturation, and over-saturation.
KEY LESSON: A hue is a pure color (they appear on a color wheel). Not
all colors are hues. A color that has been tinted, shaded, or toned is not
a hue. When you increase the color saturation level of an image, in post-
production, it only affects the pure hues: red, green, yellow, and blue.
EQUIPMENT: Any camera including mobile | Any lens | Post-processing Software
SAMPLE PHOTOGRAPHS
1 1- Outwardly, this image appears to have no hues. It’s not
dominant in red, green, yellow, or blue. So, you may
be tempted to severely increase the saturation level to
bring out some color. The software searches for any
pure hue that it can find, and increases the saturation.
This results in colors that look like crayon markings, not
natural looking.
Accurate Saturation
2- This photo has a lot of red, green, yellow, and blue. Notice how the
colors are vibrant without having the chalky crayon appearance. The
color saturation level has been set properly to enhance the photo.
3- This example photo also has red, green, yellow, and blue. The colors
do not look as vibrant as in the previous example. This photo could
use a little increase in color saturation during post-production. The
lighting of a scene affects color saturation. Bright light increases color
2 3 saturation. Soft, less intense, lighting lowers color saturation.
Accurate Saturation
4- The color saturation level for this shot was set very high. In this case,
it works, as the image is somewhat abstract. If the previous shot,
of the child, were adjusted to this level, it would look awful. The
technique really should fit the subject. Of course, this is up to individual
interpretation.
5- This photo demonstrates 3 different color saturations levels. The lower
left part of the image is neutral, as it emerged from the camera. The
4 5 upper left has had the saturation level increased 50%. The very right
side of the image has had the saturation level decreased by 50%.
ACTION ASSIGNMENT!
1- Pick 6 images from your files. Each photo should display a different color scheme. Pick one with a lot of red,
one with green, one with yellow, and one with blue. Pick one that is strong in all of the hues. Finally, pick
one that appears absent of all of the hues (similar to the cat picture).
2- Take each photo into your editing software and create 3 different versions of that image file. One with the
color saturation as it was created in the camera. One with the color saturation increased by 50%, and one
with the color saturation decreased by 50%.
3- You should end up with a total of 18 image files. Print them all out, and study them as a group.
HOW DID YOU DO?
• Do you now understand how the color saturation level setting will affect your photographs?
• Do you now feel confident to judge color saturation levels, and also decide when they may be set too high?
READY! SET! GO! ACTION CARDS
STRETCH GOALS: COLOR SATURATION
Total time: THE SECRET WEAPON
5-7 hours
CREATING MOOD
A photograph will hold a viewer’s attention longer when it PHOTZY.COM
Difficulty Level: Challenging touches as many of the senses as possible; this includes sight, sound, taste,
Skill Points: smell, and feel. When a photo touches these senses, what we are really talking
• Understanding how to about here - is the concept of mood. What is mood in photography?
implement mood into a photo
KEY LESSON: Mood is created in a photograph when it causes the
• Discovering how color viewer to place him or herself into the moment, and/or, it causes them
affects mood to internally remember a moment that creates an emotional reaction.
It’s a complex subject. In this Action Card, we will review three areas of
• Learning how to use lighting creating mood: color, camera angle, and props.
and camera angle to
create mood
EQUIPMENT: Any camera including mobile | Any lens | Post-processing software
SAMPLE PHOTOGRAPHS
12 34 56
1- This photo creates a mood of 3- Warm colors, including yellow, 5- Mood is established through the
choice of an old decaying subject, a
fantasy. It is a very easy idea to often evoke feelings of happiness, dramatic ‘Dynamic Angle’, and post-
processing with the “Pastel Color
execute. Color plays a huge factor: optimism and energy, which is in Effect’. Each choice helped to set
the mood. Can’t you almost taste the
orange and red colors tend to create direct opposition to the woman’s dry air or hear the metal grinding as
it swings under pressure from the
a mood of attraction. Adding the pose, expression, and the choice of wind? That’s a mood!
6- This example is a little direct.
firefly spots was super easy using camera angle. When trying to set Don’t be afraid to explore that! Set
goals, and then create photos that
the app, Lens Distortions. a mood, make sure you don’t send achieve those goals. For the Action
Assignment create four pictures
2- Red and orange attracts. Blue mixed signals to your viewer. where only the mood will change in
each photo. (See below.)
and green repels, especially when 4- This picture evokes a somewhat
used in combination. And thus this negative mood. This is created
photo uses that combination to through camera angle and pose.
create a mood of mystery. The red What if the photographer had
and orange excite a viewer to see dressed the model in bright yellow?
what’s inside. However, the blue That would have ruined the mood!
exterior almost feels like a warning. These little steps are important to
learn advanced photography.
ACTION ASSIGNMENT!
1- Go on a 3-hour photo shoot where you explore color, or color combinations, to set a very specific mood that
you decide on as you’re taking the pictures.
2- Create 4 images that have the word LOVE physically displayed in each one. Set the mood for each photo as
follows: First shot: the mood is love. Second shot: the mood is hate. Third shot: the mood is loneliness.
Fourth shot: the mood is happiness.
3- Use post-production as necessary to hammer home your mood setting images.
4- Print 4 shots from Action Assignment #1 and all four images from Action Assignment #2.
5- Ask friends and family to look at your resulting images. Ask them how each image makes them feel.
HOW DID YOU DO?
• Do you understand how mood affects a viewer’s experience with your images?
• Did your friends and family understand your intent? If not, how can you improve your next effort?
READY! SET! GO! ACTION CARDS - STRETCH GOALS: CREATING MOOD
Total time: EXPOSURE BLENDING PHOTZY.COM
4-6 hours
SAVES THE DAY
Difficulty Level:
Very challenging Some scenes have a dynamic range outside of the camera’s
ability to accurately record. Exposure blending helps to
Skill Points: reign in extreme contrast.
• Learning how exposure
blending works KEY LESSON: Exposure blending requires a layer based editing
• Learning how to shoot and program. Keep the aperture setting the same for all exposures. Shoot
blend several images one frame, at the exposure indicated by the camera meter, and then
• Evaluating the end result of one frame that is underexposed by 1-stop, and another over-exposed
by 1-stop. Sometimes 1-stop isn’t quite enough exposure change. We
an exposure blend recommend bracketing 2-stops in both directions.
EQUIPMENT: Any camera with exposure bracketing capability | Any lens | Layer-based software
1 SAMPLE PHOTOGRAPHS
2
1- Normal Exposure: In high contrast situations, the camera did its best
to create a balanced exposure. Yet, the histogram reveals that the dynamic
range was too great, and both the highlights and shadows were clipped off.
2- Layered: Place the three images into a single multi-layered image file. Put
the normal exposure on the bottom, the +1 stop file next, and the -1 stop file
on top. Be sure to “Align” the three layers, so that there is no ghosting. You
may have to crop along the edges of the shot after the alignment is complete.
3- Layer Masks: On each of the upper two layers create a “Hide All” (appears
as a solid black panel) layer mask. We will use the +1 stop layer to raise
the dynamic range of the shadows, and we will use the -1 stop layer to
lower the dynamic range of the highlights.
Blending: Use the color white and the brush tool. Set the Hardness of
the brush to 0. Set the opacity between 15% and 35 %. Select the +1 layer
and paint where you wish to bring up the shadows. Select the -1 layer and
paint where you wish to reduce the highlights. The histogram is no longer
clipped off. If you paint the mask and don’t like the result, switch the color
3 to black and paint over the area that you’re unhappy with. When you’re
done, you should save the file in a layered format, as well as in a flattened
version.
+ 1 Stop - 1 Stop Layered
ACTION ASSIGNMENT!
1- Organize a photo shoot similar in content to the example photo: High contrast scene / Deep shadows and
bright highlights / Use a static subject (no cars and no people) / Use a tripod / shoot three frames: Normal,
Under 1-stop, Over 1-stop
2- Import your images into your editing software and blend them. Watch the exposure blending bonus video.
HOW DID YOU DO?
• Did your files line up when layered? Do you understand how blending compresses the dynamic range?
• Were you able to produce a better photograph than any of the three original image files?
READY! SET! GO! ACTION CARDS
STRETCH GOALS: EXPOSURE BLENDING
Total time: THE LOWDOWN ON
3-5 hours
LONG EXPOSURE
Difficulty Level:
Very challenging This type of Long Exposure Photography is created in bright PHOTZY.COM
Skill Points: ambient light, as opposed to shooting at night. Long Exposure
• Learning how Long Photography is unique because it mixes blurred motion, with sharp details,
Exposure Photography
works presented in bright ambient lighting.
• Discovering what subjects
work best KEY LESSON: For this genre of photography, you will need at least
• Learning how to avoid one ND filter; start with a 6-stop filter. The primary difficulty in LEP
the pitfalls is unwanted camera movement: use a steady tripod. Experiment with
exposures from 1/2 second to 30 seconds. Begin by shooting at dusk.
Use a remote or cabled shutter release. Some object in the scene must
be moving, and some object must be completely still. Don’t shoot on
bridge decks or the top of a building when starting out.
EQUIPMENT: Camera/Bulb capable | Wide-angle to normal lens | Remote release | Tripod | ND filter
SAMPLE PHOTOGRAPHS
12 3 4 5 6
1- This is a classic long exposure photo. The clouds and the shutter speed and the speed at which objects are
water are in motion, and the landscape is steady. The moving. The movement of clouds may be imperceptible
exposure has been slowed down significantly with the to the naked eye, but show sleek motion when captured
use of ND filters. The length of the shutter speed will at a 30 second exposure. If you’re interested in Long
change the effect. Exposure Photography, check out Photzy’s detailed
2- Dusk is a perfect time of day to begin experimenting Premium Guide titled, “The Complete Guide To Long
with Long Exposure. Mount your camera to a tripod. Exposure Photography”.
Shift to manual focus. Focus the lens. Determine 5- Using a shutter speed closer to 30 seconds
exposure without the ND filter. Set-up the remote maximizes blur, even on the slightest movement.
shutter release. Attach ND filter. Calculate the This setting often creates a “creamy” appearance to
exposure adjustment with the ND filter. Set manual water and clouds.
exposure including ISO, aperture, and then shutter 6- A photo killer to this technique is unwanted blur.
speed. Fire shot. Review. Adjust. Lock the camera down tight. If it’s breezy outside,
3- Using a shutter speed closer to 1/2 sec will yield less attach extra weight to the tripod, such as a 10 lb.
motion blur depending on the speed of the movement. sandbag. Avoid setting up in areas that move such
4- The Long Exposure effect varies with the length of as bridge decks.
ACTION ASSIGNMENT!
1- Acquire at least one ND filter. You can start with an inexpensive one. You should be able to find one for
$25 - $40 online.
2- Set up 2 shoots: one for midday and one for dusk. Find appropriate subjects: movement and steady.
3- You need to recalculate exposure after attaching the ND filter. Most filters come with an exposure
adjustment chart, or you can get the smartphone app, “LE Calculator”, which is super easy to use.
4- Create shots of at least 6 different subjects. Vary your lens focal length and exposure times.
HOW DID YOU DO?
• Do all of your attempts have something with sharp focus present in the shot? If not, you’ve been tanked by
camera shake. Try again.
READY! SET! GO! ACTION CARDS
STRETCH GOALS: LONG EXPOSURE
Total time: DEMYSTIFYING THE
4-6 hours
HISTOGRAM
Difficulty Level: The histogram is one of the most powerful tools at your
Very challenging disposal in digital photography. It provides a measurable PHOTZY.COM
Skill Points: account of what is happening with the pixels of your photograph. This tool
• Expanding knowledge on
histogram use originated from mathematics. It merely plots data. It takes experience to
• Learning to read the
interpret what the histogram is telling you about your photograph and why.
histogram
• Evaluating histograms KEY LESSON: Using the histogram, you can evaluate: exposure,
contrast, brightness, and color balance. The basic line on histograms is
and making adjustments that they should appear as a mountain range that ends at either end of
the graph before being clipped off.
EQUIPMENT: Any camera including mobile | Any lens | Photo Editing Software
SAMPLE PHOTOGRAPHS
1- The left side of the histogram represents the deepest blacks. The right
side shows the brightest whites. Everything in-between is the various tones.
Looking at the histogram vertically. The baseline is zero. As the graph rises from
the baseline, it tells you how many pixels are in a particular tonal range. This
1 histogram is telling us that there are many midrange tones.
23 45
2- This image appears to have a full range of tone. The 4- This image is mostly white tones. Trying to adjust
histogram tells us that it doesn’t. The blacks look it back to the left would ruin the shot. Using the
good. But, the whites have fallen far short on their Highlights slider, the clipping can be removed. The
side of the graph. The histogram has just told us elevated blue area tells us that there is predominance
that this shot is low in contrast. of blue in the shadows. The white scale is strictly
3- Adjusting the Exposure and the Highlight values brightness value. The individual colored scales can
moved the histogram toward the right side, help you to determine if your image has an color bias.
correcting the contrast. When adjusting the 5- When a shot is made of predominantly dark tones,
histogram, always watch the preview window. If the histogram is going to be skewed to the left; it
you’re working the whites side- watch the brightest does not indicate underexposure. It’s also important
areas, so that you don’t over-adjust and lose detail. to have some part of the histogram reach the whites
When adjusting the blacks watch the shadows in the side (if possible). Don’t try to move the entire histo-
picture so that they don’t block up. gram to the right, or you’ll ruin the low-key effect.
ACTION ASSIGNMENT!
1- Organize a photo shoot similar in content to the example photos.
• Place your model in three situations: a dark setting that still has some white areas, a white setting that
still has some dark areas, and a setting with a full range of white to dark (study the example photos)
• Create a number of different shots and vary your exposures by no more than + or - one stop.
• Go through your files and pull 10 images. Pick some that are too dark, some that are too light, some that
look good to your eye, some that are close, but you believe could be better. Study all the histograms on
your photos. Try to adjust them.
HOW DID YOU DO?
• Do your finished photographs reflect a histogram that matches your intent?
• Were you able to adjust the histogram and make your images better?
READY! SET! GO! ACTION CARDS - STRETCH GOALS: HISTOGRAM
Total time: THE BEAUTY IN THE BAD
3-5 hours
LENS ABERRATIONS
Difficulty Level: Normal
Camera manufacturers have worked diligently trying to perfect PHOTZY.COM
Skill Points: camera lenses. One of the first innovations that made a huge
• Recognizing lens produced difference in lens quality was the incorporation of multi-coating. Early lenses
aberrations in a photograph displayed all kinds of aberrations, distortions and defects. Photographers now
• Using lens aberrations look to those imperfections as a source of creative inspiration.
creatively in-camera
• Creating lens aberrations KEY LESSON: Lens flair, vignette, and chromatic aberrations are the
most commonly known lens producing defects. Since most lenses are
artificially using apps designed to help eliminate these as problems, the best way to creatively
incorporate them back is through the use of editing apps.
EQUIPMENT: Any camera including mobile | Any lens | Specialized Editing Apps
SAMPLE PHOTOGRAPHS
12 345
1- This image displays two classic lens aberrations. 4- Most lens aberrations become noticeable when
The first one is Lens Flare: streaks of light coming faced with backlighting. Knowing this can help
from the light source. The second is called Ghosting you to control it, and even use it creatively, as this
Flare: the round aberrations present in the lower photographer did. You can control the amount
right. This is usually caused by an older lens, or a of lens flair and ghosting flare by changing your
lens of poor quality with non-multicoated lenses. camera point-of-view (POV) - so that the light
source moves in and round an opaque object- such
2- A dirty lens, an old lens, or a lens of lower quality, as the tree limbs.
will often display ‘veiling flare’ when confronted with
strong backlighting. Be careful of this aberration, 5- There are many apps that can introduce lens
as it can easily ruin a photograph by wiping out aberration defects into perfect digital picture files.
important details in an image. Some of our recommended apps are: LensFlare,
Rays, LD (Lens Distortions), LightLeaker, Snapseed,
3- In recent years there has been a trend toward using and AfterFocus. These apps are easy to use, and
toy lenses, old lenses, and manufacturers are even they allow you to take a simple photo, such as
designing new lenses that have old world defects. this ‘Dead End” image, and turn it into something
These lenses will often show a vignette as well as visually interesting.
color shifts and focus aberrations.
ACTION ASSIGNMENT!
1- Organize a photo shoot similar in content to the example photos. Keep in mind that you want backlighting.
• Shoot at sunset.
• Have an opaque object in the shot (similar to the trees in the 3rd example photo), so that you can
experiment with moving the light source in and out to vary the effect.
2- Select 3 photos from your image files, which contain backlighting. Download three of the above mentioned
apps. We suggest starting with LD, Snapseed, and LensFlare. Play with the apps to create lens aberration
defects (lens flare, ghosting, and vignette).
3- Print out your results and share them with others.
HOW DID YOU DO?
• Did you make creative use of the backlighting and lens aberrations?
• Did you enjoy augmenting your photos with the app software?
READY! SET! GO! ACTION CARDS
STRETCH GOALS: LENS ABERRATIONS
Total time: FUN WITH
2 - 3 hours
FOCUS STACKING
PHOTZY.COM
Focus stacking is the photographer’s dream come true.
Difficulty Level:
Very challenging It allows us to cheat the physics of optics, and thus create a depth of field
Skill Points: window that simply was not possible before digital photography. Some
• Learning focus stacking cameras have a “Focus Stacking” feature built into them, which makes the in-
• Discovering how to create camera portion of this technique a snap.
a focus stacked image
• Creating a focus stacked KEY LESSON: If your camera does not have the built-in feature for
photograph focus stacking, use manual focus. Always use either Manual Shooting
EQUIPMENT: - Tripod Mode or Aperture Priority mode. Do not change the f/stop throughout
- DSLR, mirrorless, or hybrid the process. A tripod is essential. Place the lens critical focus onto the
camera w/ focus stacking nearest point within your scene - where you want the DOF window to
feature if possible begin. For each successive shot, move the focus barrel 1/8th of a turn
- Lens w/ manual focus capability toward infinity. We recommend creating between 5 – 25 shots.
- Software w/ layering capability NOTE: The term stacking, in Lightroom, is not the same function.
STEP-BY-STEP
1 2 1- The camera settings for this single shot image were:
150mm lens with an extension tube, 1/100th of a second
shutter speed, f/11, ISO 1600, Aperture Priority, Pattern
metering mode. Critical focus was placed where the red
arrows are pointing. DOF was less than .5 inch (1.25 cm).
2- Focus stacking extended the DOF window down to
the body of the cactus. 11 photos were created. For each
shot, the lens was focused 1/8th of a turn closer to infinity.
3- We are using Photoshop. Any full-featured layer-based
editing program should have this feature. Select
34 File>Scripts>Load Files into Stack. You can also
manually load separate image files into a single image
file stack using the layers palette.
4- Using Browse navigate to your files and select them.
For this photo we created 11 frames. Select Attempt to
Automatically Align Source Images. Even when using a
5 tripod, there may be movement between frames.
5- Select all of your layers. Select Edit>Auto-Blend Layers.
6- Choose Stack Images, and select Seamless Tones and
67 Colors. Click OK.
7- Photoshop automatically examines each layer, and then
selects the sharpest area within that image. It then
masks out the remainder of the picture, in each layer,
and blends them together. Flatten your image, and save.
ACTION ASSIGNMENT!
1- Organize a photo shoot similar in content to the example photo.
• Follow the shooting and editing guidelines listed above.
• If there was camera movement, you may see some ghosting along the edges of your blended focus stack.
Leave a little extra room when shooting, and crop the ghosting in post-production.
• If you’re unsure about creating and working with stacks, watch the “Exposure Blending Bonus Video”.
HOW DID YOU DO?
• Did you create a focus-stacked image with very little ghosting? If not, practice keeping the camera still.
• Were you able to successfully load and execute a blended focus-stacked image? If not, try again.
READY! SET! GO! ACTION CARDS - STRETCH GOALS: FOCUS STACKING
The words you are searching are inside this book. To get more targeted content, please make full-text search by clicking here.
Discover the best professional documents and content resources in AnyFlip Document Base.
Search
Photo Lessons
- 1 - 20
Pages: