MLT428 HISTOLOGICAL TECHNIQUES
HISTOLOGICAL
TECHNIQUES
LAB REPORT
PARAFFIN SECTION | FROZEN SECTION
Prepared by: (2020476542)
ELEANOR JOY JOLMIN (2020878128)
MUHAMMAD AMIRUL AIMAN BIN ZAINUDIN (2020483166)
NUR SOFIYA BINTI SUKANDAR (2020455886)
NURUL AIN NASTASHA FAZIERA BINTI PA’E (2020605096)
SITTI NUR AISAH BINTI BINTI JALIL
Lecturers:
MADAM HARTINI BINTI YUSOF
DR. NUR AYUNIE BINTI ZULKEPLI
1.0 HISTOPATHOLOGY
LABORATORY WORKFLOW
INTRODUCTION
Histopathology involves microscopic examination of tissue specimens. Since fresh tissue is delicate, all
samples received in the laboratory must be preserved or fixed with chemicals in order to maintain the tissue
structure. Paraffin sectioning is a routinely used method in histopathology in which the specimen will be
infiltrated with paraffin wax. Each of the samples will undergo detailed procedures that begin with tissue
fixation with formalin to maintain the tissue structure. The selected part of the specimen will be cut into a
proper size and immersed in several chemicals: formalin, alcohol, xylene, and paraffin at different
concentrations. Then, the tissue specimen will be embedded into a paraffin block. This prepared block will be
sectioned into thin slices and placed onto the microscopic slide. The slides will be dried to allow the excess
wax to melt away. Once the slide is ready, it will be stained using chosen stains such as hemotoxylin and eosin
(H&E) stain, mounted, and viewed under a microscope for clinical observation. The tissue examination will aid
in the clinical diagnosis.
FLOWC
HART
1. Tissue grossing 2. Tissue fixation 3. Tissue processing
6. Tissue 'fishing' 5. Tissue sectioning 4. Tissue embedding
7. Tissue staining 8. Tissue mounting 9. Tissue labelling
1.1 TISSUE PREPARATION
REQUIREMENTS PRINCIPLE
MATERIALS
Tissue grossing is the process in which specimen samples go through a
Scalpel blades process of cutting or grossing into smaller parts depending on the size and
Scalpel holders type of specimen. The specimen is either taken entirely or a ‘representative’
Forceps section that was placed into a small cassette.
Tissue cassettes Tissue fixation is a crucial process where the tissue and cellular composition
Dissecting boards of cells is preserved to allow the cells to withstand processing. Fixation of
Medisheet tissues also prevent breakdown of the tissues as well as the molecular
Gloves feature by the enzymatic activity for long-term storage.
Tissue specimens
(appendix/uterus) in 10% R
buffer formalin E
S
EQUIPMENT U
L
Ducted fume hood T
Brand: IRYAS Model: ADe - 6BI S Tissue specimens in 10% formalin
TROUBLESHOOTING REASON SOLUTION
PROBLEM Tissue sample is cut too Tissue slices should be thin
thick. that is around 3-4 mm.
Struggle to close the cassette
lid. Rough dissection and Handle specimen with care
dissection using blunt blade. and always use sharp blade.
Tissue trauma observed. Chopping board is dirty.
Always starts off with a
Presence of debris or foreign properly cleaned chopping
matters. board.
PROCEDURE CONCLUSION
1.Cassette was labelled according to the type of specimen with student name, In conclusion, skills in examining and
student ID, date and specimen type using pencil. choosing the best orientation and
2.The grossing workstation was prepared by turning on the grossing station fume part to cut for tissue processing was
hood and the instruments are ensured ready to be used. successfully developed at the third
3.Specimen grossing was performed one at a time and placed the specimen into cycle. Choosing which part to be cut
the cassette. is important in order to be able to
4.The tissue cassette was placed into 10% Neutral Buffered Formalin. examine the desired tissue part for
5.Formalin waste was discarded into the formalin waste container. disease diagnosis.
.
1.2 TISSUE PROCESSING
REQUIREMENTS PRINCIPLE
MATERIALS tissue Tissue processing involves physical and chemical methods. The interchange
Fixed specimen between the tissue’s internal fluid and its surrounding solution occurs during the
(appendix/uterus) in 10% formalin tissue immersion will extract the water, replacing it with the support medium.
Forceps Specimen will undergo fixation, dehydration, clearing, and infiltration during this
Gloves process by which the selected part of the tissue will be immersed in each chemical
at different concentrations and periods.
10R%EANGeuEtNraTlSBuffered Formalin
Alcohol (Absolute, 95%, 80%, 70%, PROCEDURE
50%)
Absolute Alcohol and Xylene Mixture A. Reagents are prepared as follows;
(50:50) 1.2L of 50% alcohol is prepared by adding 1000ml of absolute alcohol to 1000ml of distilled water.
Paraffin Wax 2.2L of 70% alcohol is prepared by adding 1400ml of absolute alcohol to 600ml of distilled water.
Distilled Water 3.2L of 80% alcohol is prepared by adding 1600ml of absolute alcohol to 400ml of distilled water.
Xylene 4.2L of 95% alcohol is prepared by adding 1900ml of absolute alcohol to 100ml of distilled water.
5.2L of alcohol and xylene mixture is prepared by adding 1000ml of absolute alcohol to 1000ml of
EQUIPMENT xylene.
Brand: Shandon 6.All reagents are poured into its respective reagent container in the tissue processor.
Citadel B. Tissue processing
1.The cassettes containing the grossed samples are placed into the cassettes basket.
2.The basket is placed in the automated tissue processor and the time is set according to its
Model: SHA appointed time as shown in Table 1.
69800001
R Table 1: Program for routine overnight tissue processing
E Derived from laboratory manual for MLT428 Histological Techniques
S
U
L
T
S Tissue specimens at
the end of the cycle
TROUBLESHOOTING
PROBLEM REASON SOLUTION
Tissue section become cracked and Excessive dehydration Soak the block with a wet gauze before
folded sectioning
Dehydration inadequate and there is Change the processing program and give
During sectioning, tissue is coming defective paraffin infiltration in tissue adequate time for dehydration
out from the block
Improper dehydration Fluid are changed according to the schedule
Poor processing Excessive dehydration Change the dehydration time. It is better to
process the smaller biopsy tissue separately
The edges the tissue section from larger tissue to have proper dehydration
affected by microchattering
CONCLUSION
Tissue processing is important to make sure that water is adequately removed and replaced with support medium to harden the
tissue. During this process, skills to prepare the reagents were developed together with the precautions while handling the
reagents. Other than that, the skill to operate the tissue processor was also developed. The skill of reagent preparation and
reagents loading order and operating the timing in tissue processor are important to ensure that the tissue undergoes proper
dehydration and consequently absorbs right support medium.
1.3 TISSUE EMBEDDING
REQUIREMENTS
MATERIALS: PRINCIPLE
Processed tissue blocks
The process of orienting tissue in the
APPARATUS correct direction and surround it in a
Forceps molten liquid such as wax by using a
Scraper mould. Allow it to solidify and generate a
Steel block mould block for cutting. The aims are to provide
Gauze sufficient external support of the tissue,
Tissue paper avoid tissue distortion during the cutting
Gloves process and preserve the tissue for
Aprons archival purposes.
Masks
Paraffin wax tissue embedding centre
Brand: Slee Mainz
REAGENT Model: MPS/C MPS/P MPS/W
Paraffin wax
EQUIPMENT PROCEDURE
Paraffin wax tissue embedding centre
R 1.The temperature of the paraffin tank is examined to ensure that it is
E higher than the melting point of paraffin wax; within 54C-60C.
S
U 2.The light and cryo console is switched on.
L 3.The tissue cassettes are placed into the cassette bath.
T 4.The cassette is opened to view the tissue sample.
S 5.Mould chosen must be suitable for the tissue size.
6.A small amount of molten paraffin is poured into the mould.
Processed tissue blocks 7.By using warm forceps, the tissue sample is transferred from the
TROUBLESHOOTING cassette into the mould. The tissue surface that needs to be observed
must be facing downwards in a correct orientation.
PROBLEM REASON SOLUTION 8.The mould is placed onto the cold plate.
Cracks on Too much Place the wax mould 9.The tissue is gently pressed and held until the thin layer of paraffin
the tissue pressure when on the hot plate when solidifies.
blocks are placing the placing the tissue into 10.The labeled cassette is placed on top of the mould and the mould is
seen. tissue in the wax the wax. filled with molten paraffin wax until it fully covers the cassette.
when it already 11.The forceps are wiped to clean the excess wax on it.
started to 12.A small piece of labeled paper is placed on top of the cassette.
solidify. 13.The mould is immediately cooled down by placing it onto the cryo
console.
Only a The embedded Add just a little 14.After the wax solidifies, the paraffin tissue block is removed from its
fraction of tissue being in a pressure when placing mould.
tissue is different level. tissue to level the 15.Excess wax is removed from the paraffin tissue block by using scalpel.
seen tissue on the wax. 16.The light and cryo console is switched off when all the tissues are
embedded.
Epithelium Wrong The right orientation is
cannot be orientation of identified and is CONCLUSION
seen tissue embedded facing
properly embedded downwards Embedding tissue is important in preventing the tissue distortion
during cutting, preserving the tissue for archival use and providing
support to the tissue to be cut on the microtome. During
embedding, the skill using tissue embedding center and dealing
with paraffin wax was developed in order to avoid the cracks on the
block. In tissue embedding, a proper tissue orientation is very
important to make it easier to be cut by microtome during tissue
sectioning.
1.4 TISSUE SECTIONING
REQUIREMENTS PRINCIPLE
MATERIALS: Paraffin blocks Sectioning is the process of cutting paraffin embedded tissue blocks into thin
APPARATUS slices sections. This thin tissue sections able to absorb dyes during tissue
staining, allowing visualization of the tissue structures. Sectioning also
Slide racks Pasteur pipettes necessarily reduces the specimen to a two-dimensional representation during
Glass slides Applicator stick the microscopic examination. On the other hand, thick slices layer will result in
Microtome blades Pencils over-staining and interferes microscopic observation.
Brush Biohazard bags
Gauze R
Newspaper Slee Mainz E
Forceps CUT5062 S
Thermometer U
L
EQUIPMENT XH-1001 T
Rotary microtome Thermo Scientific S
Tissue floatation bath
Freezer Tissue sections on
Drying oven
microtome.
Floating out (fishing) of Glass slide containing
selected tissue section. tissue section.
PROCEDURE
Trimming: Sectioning:
1.The tissue block is placed
onto the standard object 1.Insert the new blade.
clamp. 2.The tissue block to be sectioned is taken out of the freezer once it is cooled and placed onto the
2.The “M” button is selected for
trimming mode. standard object clamp.
3.The trimming thickness is set: 3.The “M” button is pressed once again for sectioning mode.
4.The sectioning thickness is set ranging from 3-5 microns.
a.Large tissue pieces: 10- 5.Paraffin tissue block sectioning started to produce ribbon sections.
20microns 6.The ribbon sections are pulled from the blade using an applicator stick or forceps and are
b.Small biopsies: 5-10 transferred into the floatation or water bath filled with distilled water (45°C).
microns. 7.The ribbons are laid on the floatation bath and the best section is selected from the ribbon
4.The finger protection guard is sections.
removed and trimming 8.Using a glass slide, floating out (fishing) of selected sections is performed onto the slides.
started until the complete 9.The glass slide containing the tissue section is placed onto the slide rack.
tissue section appears on the 10.The glass slide is placed into the drying oven for 37°C (overnight) or 58-60°C (15-30 minutes).
ribbon. 11.The slide(s) is labelled on the frosted end with pencil and the label consists of student name,
5. The trimmed paraffin blocks student ID number, date and type of specimen.
are placed in the freezer at
-20°C to cool. The microtome handle is locked after completion.
Microtome blade is removed and kept in a designated container while blunt used blades are disposed
6.The used microtome blade is in a sharp container.
removed and disposed into Residual tissue, wax is removed from the microtome using a brush and disposed into the biohazard
the sharps container. bags.
The microtome is cleaned by using paraffin repellent.
The microtome and floatation bath is switched off and cleaned.
CONCLUSION TROUBLESHOOTING
Skills required to properly use a
microtome is successfully achieved PROBLEM REASON SOLUTION
which perfect ribbon of tissue Sections did not Dull blade. Use a new blade.
sections were able to be produced. form ribbons. Block too warm Adjust the block holder angle.
Block surface not parallel to the blade.
this manual process require Sections roll up
consistent and delicate handwork upon cutting. Dirty or dull blade. Use new blade.
aas the tissue section is very delicate Sections are Block too warm. Cooldown block.
and easily damaged. wrinkled.
Dull or dirty blade. Use new blade.
Slow or uneven rotation. Apply consistent wheel rotation.
1.5 TISSUE STAINING
REQUIREMENTS PRINCIPLE
Materials Reagents The principle of tissue staining is to enhance the
important features or part of the tissue. In tissue
Unstained tissue slides Hematoxylin 3G (Sakura) staining of histopathology, hematoxylin and eosin
Eosin (Sakura) the dye is routinely used. Hematoxylin 3G is a basic
Xylene dye that is usually used to stain the nucleus
Apparatus Alcohol (Absolute, 95%) components of the tissue and give the bluish
Slide racks Distilled water colour. On the other hand, eosin is used to stain
Forceps Tap water cytoplasmic components of the tissue and give rise
Filter paper to a pinkish color.
Tissue paper
Funnel
Measuring cylinder
PROCEDURE
R A. Preparation of various 7. Wash in running tap water (1 minute)
E concentration of alcohol. 8. Distilled water (1 minute)
S 9. Haematoxylin 3G (Sakura) (5 minutes)
U 95% Alcohol (400ml) 10. Wash in running tap water (5 minutes)
L 380ml Absolute Alcohol+20ml 11. Distilled water (30 seconds)
T Distilled Water 12. Eosin (2 minutes)
S Stained slides in B. Tissue staining 13. Distilled water (10 seconds)
i. Unstained slides is removed from the 14. 95% alcohol (10 seconds)
the staining basket oven. 15. 95% alcohol (10 seconds)
ii. Slides are stained according to the 16. Absolute alcohol (1 minute)
procedure below. 17. Absolute alcohol (1 minute)
1.Xylene (3 minutes) 18. Absolute alcohol (1 minute)
2.Xylene (3 minutes) 19. Xylene (1 minute)
3.Xylene (3 minutes) 20. Xylene (2 minutes)
4.Absolute alcohol (1 minute)
5.Absolute alcohol (1 minute)
6.95% alcohol (1 minute)
TROUBLESHOOTING
PROBLEM REASON SOLUTION CONCLUSION
The hematoxylin stain The efficacy of Discard the hematoxylin and Good tissue staining and reagent
is too light. (The nuclei hematoxylin is reduced. replace with new hematoxylin. preparation skills were able to be
are too pale) achieved in the third and fourth cycles.
The section is too thick. Recut the section with Although all the prepared slides were
The hematoxylin is too appropriate thickness. stained according to the given standard
dark. (The nuclei are The section is too thin. operating procedure, some tissues
overstained). Recut the section if required sample has a darker color than the other
after checking the thickness of tissues. This shows that tissue staining
The eosin is too pale. the section. are also affected by the thickness of the
tissues.
Cytoplasm is The section have been Decrease the staining time.
overstained and has stained in eosin for too Allow more time for
poor differentiation. long. appropriate dehydration with
The section dehydrated in alcohol.
alcohol too fast.
1.6 SLIDE MOUNTING AND
LABELLING
REQUIREMENTS PRINCIPLE
Materials Chemical To preserve a stained tissue for viewing under the
microscope, it must be mounted on a clear slide and
Slide holder Mounting medium: Coverseal-X covered with a thin clear coverslip. A mounting medium is
Coverslip used to adhere the coverslip onto the slide. Care must be
Applicator taken to avoid air bubbles under the coverslip.
stick
Self-adhesive PROCEDURE
label sticker
Medisheet
Equipment
Ductless fume hood 1.Task is performed in a fume hood.
Brand: ESCO Model: Ascent MAX 2.Appropriate coverslip is chosen according to the size of
R the tissue section.
E 3.Adequate mounting medium is placed on one edge of the
S
U coverslip.
L 4.The slide is lowered gently until it touches the mounting
T
S Slides with coverslip and dried medium. Capillary attraction will cause the mounting
medium to flow upwards, carrying the coverslip along
mounting medium. with it.
5.The slide is examined macroscopically to ensure there
are no air bubbles. The coverslip is pressed gently with
an applicator stick to remove the air bubbles.
6.Slides is labeled with:
- Type of specimen
- Staining method
- Student name
- Student id name
- Date
8. The sticker label is placed at the frosted end of the slide.
.
TROUBLESHOOTING CONCLUSION
PROBLEM REASON SOLUTION The techniques for
Residues of the mounting Putting too many drops of One to two drops of mounting mounting and covering the
medium on the coverslip sides. mounting medium. medium is already sufficient to stained tissue slides without
cover the tissue and cover slip.
any air bubbles or artifacts
Air bubble formed can be removed was successfully achieved
Air bubble formed during Air bubble can form when the by pressing gently on the air after the second cycle.
mounting. coverslip is closed too rapidly. bubble towards the edge of cover
slip by using applicator stick.
Presence of artifact or air
bubbles will interfere during
tissue microscopic
Cover slip moved after mounting. This could due to insufficient Allow the mounting medium to dry
drying. sufficiently before storing the
slide. examination.
2.0 FROZEN SECTION
REQUIREMENTS PRINCIPLE
Material Reagents Equipments The frozen section process involves rapid
freezing of the tissue sample that will
Fresh tissue Tap water Ductless fume hood ( Brand: convert water in the tissue into ice. The
specimen Haematoxylin ESCO, Model: Ascent MAX) firm state of the ice within the tissue acts
Apparatus 3G (Sakura) as a support medium during tissue
Eosin (Sakura) Cryostat ( Brand: Slee Mainz sectioning instead of using paraffin wax.
Scalpel and blade Distilled water MEV) Using a cryostat, the tissue will undergo
Forceps Absolute freezing and sectioning at the temperature
Mould alcohol of -20C. This technique is used to
Microtome blade 95% alcohol immediately diagnose a tissue when a
Brush Xylene rapid result is required. It is also used for
Slide racks 10% formalin immunohistochemistry and
Applicator stick immunofluorescence study.
Glass slide Medium
Coverslip Tissue freezing
Self-adhesive sticker medium
label Mounting
Medisheet medium
Gloves (Coverseal-X)
PROCEDURE
A. Reagents preparation C. Tissue staining and mounting.
1.Various concentration of alcohol and other 1.Rapid H&E staining was performed following the procedure in
staining reagents are prepared. the Table 2 below.
2.The stained slides were then mounted.
B. Tissue sectioning Table 2: Procedure for rapid haematoxylin & eosin staining
1.The temperature of the cryostat is set at -20 Derived from laboratory manual for MLT428 Histological Techniques
degree Celsius.
2.The specimen is grossed and then embedded
on a specimen disc with Tissue Freezing
Medium and is frozen.
3.The embedded specimen disc is placed on the
orientable specimen head.
4.The tissue was trimmed at 10 µm thick until the
specimen tissue is exposed.
5.Sectioning was performed at 5 µm thick until a
ribbon is obtained.
6.The sectioned ribbon of the tissue is placed
onto a labeled slide. The unstained slide was
immediately placed into a pre-heated 10%
formalin for about 1 minute.
2.0 FROZEN SECTION
TROUBLESHOOTING
PROBLEM REASON SOLUTION
Artifact that has been frozen Ice crystals form within the tissue. The tissue is freezing rapidly.
Do not place the tissue specimen
Uneven tissue embedding The tissue surface is uneven and the in saline solution before freezing.
Loosen of block during vital formation may be lost. Before freezing, make the tissue
chucking Tissue may be too cold when placed even at the cutting surface.
Tissue crumpled on the chuck. Take the tissue out and reattach it
Tissue with a thin stripe on a clean check which is not too
Widely striped and tearing of The tissue in the block is either too cold.
the tissue hot or too cool. Make sure the block tissue is in
Nicks on the blade caused the optimum temperature: -15oC to
perpendicular tear in the tissue. -20oC.
Tissue is sticking with the blade. Blade should be replace with a
sharper one.
The blade must be clean or replace
with a new one.
CONCLUSION
Frozen section is mostly important
for providing an immediate report of
the sample. Diagnostic accuracy of
Unstained the slides from frozen section
slide technique can be considered high.
However, a small sample size and
R
E without the use of special stains can
become a limitation to this
S Credit: Damien Harkin procedure. This requires close
https://www.youtube.com/watch?v=UnCLhowHucU
U cooperation between the
pathologist and the surgeon for a
L definitive and accurate diagnosis.
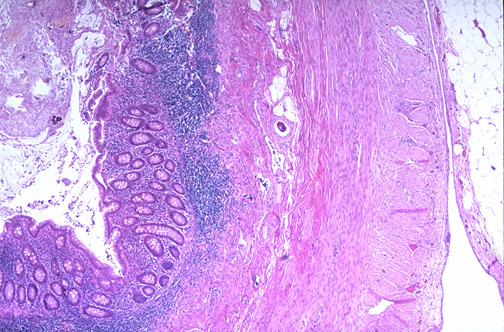
T Stained
S slide
Credit: Pierre Gauthier
https://www.researchgate.net/figure/We-selected-one-frozen-section-
histologic-glass-slide-for-each-part-of-the-specimen_fig5_41397630
REFERENCES
An, Y. H., Moreira, P. L., Kang, Q. K., & Gruber, H. E. (2003). Principles of Embedding and Common
Protocols. Handbook of Histology Methods for Bone and Cartilage, 185–197.
https://doi.org/10.1007/978-1-59259-417-7_11
CliniSciences. (n.d.). Mounting media for light microscopy.
https://www.clinisciences.com/en/buy/cat-mounting-media-for-light-microscopy-4120.html
Damien Harkin. (2021). Preparation of frozen tissue sections (Cryotomy).
https://www.youtube.com/watch?v=UnCLhowHucU
Dey, P. (2018). Frozen section: Principle and procedure. Basic and Advanced Laboratory
Techniques in Histopathology and Cytology, 51–55. https://doi.org/10.1007/978-981-10-8252-8_6
Frozen section technique III. Pathology Innovations. (n.d.).
https://www.pathologyinnovations.com/frozen-section-technique-3
Gauthier, P. (2010). Complete frozen section margins.
https://www.researchgate.net/publication/41397630_Complete_Frozen_Section_Margins_with_Me
asurable_1_or_5_mm_Thick_Free_Margin_for_Cancer_of_the_Tongue_Part_2_Clinical_Experience
Histological Techniques. Histology Lab. (n.d.).
https://histologylab.ctl.columbia.edu/histological_techniques/
Histopathology. Lab Tests Online - Explaining Pathology. (n.d.).
https://www.labtestsonline.org.au/inside-the-lab/anatomical-pathology-in-detail/histopathology
Holmes, J. (n.d.). How do you prevent air bubbles in a microscope slide? Cement Answers.
https://cementanswers.com/how-do-you-prevent-air-bubbles-in-a-microscope-slide/
Macleod, C. B., Dow, N., Guo, H., Katz, R., & Martin, E. (2016). Advantages and Disadvantages of
Frozen Section Pathology. CBM Pathology.
https://static1.squarespace.com/static/50f0a19be4b0a42e43ea5e78/t/5a54fdfc652dea585b8f1a26
/1515519485410/Frozen+Section+Pathology+Newsletter.pdf
Rolls, G. (2019). An introduction to specimen processing. Leica Biosystems.
https://www.leicabiosystems.com/knowledge-pathway/an-introduction-to-specimen-processing/
Tissue preparation. (2021). Histology at SIU. https://histology.siu.edu/intro/tissprep.htm
The words you are searching are inside this book. To get more targeted content, please make full-text search by clicking here.
1.ELEANOR JOY JOLMIN (2020476542)
2.MUHAMMAD AMIRUL AIMAN BIN ZAINUDIN (2020878128)
3.NUR SOFIYA BINTI SUKANDAR (2020483166)
4.NURUL AIN NASTASHA FAZIERA BINTI PA’E (202045586)
5.SITTI NUR AISAH BINTI JALIL (2020605096
Discover the best professional documents and content resources in AnyFlip Document Base.
Search
HS2413A_HISTOLOGY LAB REPORT GROUP 3
- 1 - 11
Pages: